Search in uioop.blogspot.com

Blog Archive

Sunday, October 28, 2007

Windows XP注册表大盘点(三)

1、防止用“添加/删除程序”配置已安装的服务
这个设置删除“添加/删除Windows组件”页面的“设置服务”选项。
运行注册表编辑器,打开已有或新建以下操作子键,并根据下表编辑你相应键值项(如果不存在此键值项请新建)。
操作子键:HEKY__CURRENT__USER\Software\Microsoft\Windows \CurrentVersion\Policies\Uninstall,在NoServices中1表示“禁用”,0表示“启动”。

2、阻止更改屏幕上的窗口和按钮样式
若启动,此设置禁用显示属性的外观选项卡上的“窗口和按钮”下拉列表。
运行注册表编辑器,打开已有或新建以下操作子键,并根据下表编辑你相应键值项(如果不存在此键值项请新建)。
操作子键:HEKY__CURRENT__USER\Software\Microsoft\Windows \CurrentVersion\Policies\System,在NoVisualStyleChoice中1表示“”禁用。

3、隐藏控制面板的“密码/更改密码”页
该技巧用于隐藏控制面板中“密码”属性中的“更改密码”标签。
运行注册表编辑器,打开已有或新建以下操作子键,并根据下表编辑你相应键值项(如果不存在此键值项请新建)。
操作子键:HEKY__USERS\.DEFAULT\Software\Microsoft\Windows \CurrentVersion\Policies\System,在NoPwdPage中1表示“禁止”,0表示“启动”。


4、屏蔽“网上邻居”中的一些功能
此设置用于屏蔽“网上邻居”中的一些功能。
运行注册表编辑器,打开已有或新建以下操作子键,并根据下表编辑你相应键值项(如果不存在此键值项请新建)。
操 作子键:HEKY__CURRENT__USER\Software\Microsoft\Windows \CurrentVersion\Policies\Explorer,在NoComputerNearMe中1表示“屏蔽掉桌面上‘网上邻居’里的‘邻 近计算机’”,在NoNetConnectDisconnect中1表示“屏蔽‘网上邻居’快捷菜单中的‘映射网络驱动器’和‘’断开网络启动器”。

5、禁止使用任务管理器
有时为了安全的需要,你可以禁止用户使用网络管理器。
运行注册表编辑器,打开已有或新建以下操作子键,并根据下表编辑你相应键值项(如果不存在此键值项请新建)。
操 作子键:HEKY__LOCAL__MACHINE\Software\Microsoft\Windows \CurrentVersion\Policies\System,在DisableTaskMgr中,0表示“禁止用户使用资源管理器“,1表示”允许 用户使用资源管理器“。

6、设置当系统从睡眠或挂起状态恢复时是否需要输入密码
当你的机器处于睡眠或挂起状态恢复时,你可以设置在恢复到正常状态时是否需要输入密码,这个设置非常有用。
运行注册表编辑器,打开已有或新建以下操作子键,并根据下表编辑你相应键值项(如果不存在此键值项请新建)。
操 作子键:HEKY__LOCAL__MACHINE\Software\Microsoft\Windows \CurrentVersion\Policies\System\Power,在PromptPasswordOnResume中,1表示“需要输入密 码“,0表示”不需要输入密码“。

7、禁止调整IE风格的界面
通过修改注册表,我们可以强迫用户使用传统风格。
运行注册表编辑器,打开已有或新建以下操作子键,并根据下表编辑你相应键值项(如果不存在此键值项请新建)。
操作子键:HEKY__CURRENT__USER\Software\Microsoft\Windows \CurrentVersion\Policies\Explore,在ClassicShell中1表示“只能选择传统风格“。

8、锁定回收站
此操作可以将回收站锁定,禁止用户使用其回收站。
运行注册表编辑器,打开已有或新建以下操作子键,并根据下表编辑你相应键值项(如果不存在此键值项请新建)。
操作子键:HEKY__CLASSES__ROOT\CLSID\{645FF040―5081―101B―9F08―00AA002F954E}\InProcServer32中shell32.dll表示不锁定回收站,shell32.dll―表示锁定回收站。

9、锁定我的文档
此操作可以将我的文档锁定,禁止用户使用其回收站。
运行注册表编辑器,打开已有或新建以下操作子键,并根据下表编辑你相应键值项(如果不存在此键值项请新建)。
操作子键:HEKY__CLASSES__ROOT\CLSID\{450DBFBA―AD25―11D0―98A8―0800361B1103}\InProcServer32中shell32.dll表示不锁定我的文档,shell32.dll―表示锁定我的文档。

10、从“我的电脑”上下文菜单中删除“属性”
当用户启动这个设置后,用用户将看不到“我的电脑”上的“属性”。
运行注册表编辑器,打开已有或新建以下操作子键,并根据下表编辑你相应键值项(如果不存在此键值项请新建)。
操 作子键:HEKY__LOCAL__MACHINE\Software\Microsoft\Windows \CurrentVersion\Policies\System\Explore,在NoPropertiesMyComputer中1表示“屏蔽属 性”,0表示“显示属性”。

11、删除“回收站”上下文菜单的“属性”
当用户启动这个设置后,用用户将看不到“回收站”上的“属性”。
运行注册表编辑器,打开已有或新建以下操作子键,并根据下表编辑你相应键值项(如果不存在此键值项请新建)。
操 作子键:HEKY__LOCAL__MACHINE\Software\Microsoft\Windows \CurrentVersion\Policies\System\Explore,在NoPropertiesRecycleBin,0表示“显示属 性”,1表示“不显示属性”。

12、隐藏“我的文档”菜单中的属性设置
当用户启动这个设置后,用用户将看不到“回收站”上的“属性”。
运行注册表编辑器,打开已有或新建以下操作子键,并根据下表编辑你相应键值项(如果不存在此键值项请新建)。
操作子键:HEKY__LOCAL__MACHINE\Software\Microsoft\Windows \CurrentVersion\Policies\System\Explore

Windows XP注册表大盘点(二)

为了恢复注册表,你必须考虑你是怎么保存注册表的。下面我谈一下一般常用的五种方法:

一,只要能启动Windows XP,那么就可以用MS Backup来恢复注册表。

1, 首先打开“开始/程序/附件/系统工具”菜单中的“备份”程序,程序运行后单击“还原”选项卡。

2, 单击你以前创建的备份旁边的+号,再选中“系统状态”的复选框。

3, 选择“工具”菜单中的“选项”,显示对话框。

4, 在“还原”选项卡上选择“无条件替换计算机上的文件”单选框。

5, 在“畚份日志”选项卡上,选择“详细数据”。

6, 设置完成后按“确定”,返回程序主界面。并确定“将文件还原到”选项框中的选项“原位置”。

7, 设置完成后,单击“开始还原”按钮,并确定弹出的“警告”对话框。

8, 继续确定“确认还原”提示框。

9, 在“输入备份文件名”后在对话框中单击“确定”。最后程序开始还原备份的饿注册表,完成后程序提示重新启动计算机时按“确定”

二,你可以使用备份程序来复制注册表文件到一盘磁带或者其他连机或脱机的地方。该备份程序然后会把注册表文件恢复到原先的位置。这种方法很简单。

1, 从磁带恢复

当你使用与Windows XP兼容的备份和恢复程序时,要确保所作的选择是恢复本地注册表,还要判断是恢复注册表唯一被破坏的文件,还是要恢复其他的文件。

2, 从Backup所支持的其他介质上恢复

使用Windows XP的Backup程序从备份的列表清单中选择System State来进行恢复。System State含有三项内容:引导文件,COM+注册类和注册表(注:不可能部分恢复System State的数据,只能全部恢复它)。你的ASR备份 除了包括System State之外还包括其他的文件,你可以根据需要进行恢复。当Active Directory正在运行时,是不能恢复System State的。在大多数备份和恢复程序之间的主要差异是在用户界面和介质的兼容性方面。千万不要忘记,通常各种磁带只能用创建此磁带备份的相同程序来进行 恢复工作。

三,从复制的注册表进行恢复

你可以复制注册表,创建与注册表完全相同的拷贝文件,然后就可以把他们再复制到原先的位置。这种方法需 要你使用第二个操作系统(多系统的配置见《Windows XP下的双引导配置》)把那些注册表文件复制回来。用copy和 xcopy命令所做的注册表畚份需要用与畚份相反的方式进行恢复。按以下的步骤从已创建的畚份来恢复注册表:

1, 启动另一个操作系统,对FAT用Windows XP/NT、DOS或Windows 98/Me:而对NTFS则使用Windows XP/NT.

2, 为了防止根本不只注册表的问题,把当前注册表保存到安全的位置。

3, 复制所保存的注册表到当前注册表的位置。

4, 启动有疑问的Windows XP版本,并测试和观察所做的恢复是否正常工作。如果不是,请往下看。

四,使用Setup来恢复

Windows XP的Backup程序也把注册表保存到%SystemRoot%Repair的目录下,你今后可以使用Windows XP的Backup程序来恢复这个文件。从Repair目录和ASR硬盘正确的恢复系统注册表需要运行Windows XP的Backup程序。当Setup启动后,它将检查坏硬盘以及查找已经安装的Windows XP系统和他们的Repair目录。一旦检查完成,Setup将给出一些选项,其中包括按F2键以运行ASR。如果你不能运行ASR,Windows XP的Setup程序将给你三种选择:

1, 现在开始安装Windows XP ,按Enter。

2, 利用Recovery Console修复Windows XP,按R键。

3, 终止安装Windows XP而退出Setup,按F3。

按R键选择修复选项,然后进入修复模式并继续进行,下一不屏幕显示四个选项,一般默认情况都为选中,你 也可以根据需要选择。接下来Setup进行设备的检测,显示信息正被检测的设备,屏幕下方的状态显示器会显示出此过程。一旦注册表更新完成,Setup程 序会提示你拿走启动器中的软盘并重新启动计算机。若一切正常,计算机将启动并正常运行。

五,加载一个.reg文件

你可以RegEdit用把注册表保存为一个带有.reg扩展名的文本文件。Windows XP 知道这是一个注册表文件。如果在文件浏览器或桌面上双击此文件,就会自动加载此文件到注册表。在命令提示状态下,输入命令start filename.reg,其中filename是注册表畚份文件的文件名。注意的是要确认所用的编辑器支持Unicode,Notepad写字板可以很 好的工作。如果你不能启动或运行Windows,你就不能用这种方法

为了修复的注册表起作用,必须重新启动 Windows XP(Windows XP在运行时高速缓存了大多数注册表内容)。只有重新启动之后,许多注册表的变化才被重新载入。

Windows XP注册表大盘点(一)

http://epasser.aydc.com.cn/article/adp/2/content20039.html

系统无法启动,应用程序无法运行,系统不稳定,有时甚至引起系统崩溃的情况,这时备份就显得很重要了, 没有人愿意系统崩溃而只得重新装Windows XP。你可以选用不同的方法来备份你的注册表,你也可以把你的备份版本放在多种介质上,但是你首先必须明白你的计算机网络正使用何种文件系统类型。 Windows XP支持FAT和NTFS两种不同的文件系统。

下面我就介绍一下几种常用的备份方法:

一,用MS Backup备份(这种方法是最常用的,我将详细介绍)

作为Windows XP中提供的通用备份程序,MS Backup(ntbackup.exe)可以备份整个磁盘驱动器,而且更重要的是,即使注册表文件是打开的并且正在运用中,MS Backup也能备份注册表,也就是说当COPY,XCOPY及实施操作无法复制时,MS Backup也能复制注册表。

1, 首先打开“开始/程序/附件/系统工具”菜单中的备份程序,程序运行后单击“畚份”选项卡。在MS Backup中备份本地注册表的唯一方法是,选择主备份窗口目录树中的“系统恢复”复选框,在备份远程注册表,复选文件夹C:\Winnnt\ System32\Config或复选里面的单个文件是有效的,但是在备份你自己的注册表时却不管用。MS Backup允许你对其复选,但是不会将他们备份。即使是系统状态备份,也没有包括构成用户指定的注册表文件:NTUSER.DAT和 USERCLASS。DAT文件。因此,你备份想包括所有注册表文件时,也要将他们进行复选。这些文件可能存放在C:\Documents and Setting\或C:WinntWrofile\文件夹下。

2, 在左边的窗口中选择“系统恢复”复选框。

3, 单击C盘中的+号,选择Documents and Setting文件夹旁边的复选框。

4, 选择“工具”菜单中的“选项”,显示选项对话框,务必在“常规”选项卡上选择“完成备份后,炼证数据”复选框。这样做使备份的时间长些,但是却能保证备份与原文件正好吻合。

5, 在“畚份类型”选项卡上,选择“普通”。你也选择其他的,不过“普通”适合于进行快速的注册表备份。

6, 在“畚份日志”选项卡上,选择“详细数据”

7, 设置完成后“确定”,返回备份程序主界面。单击下放的“浏览”按钮,选择目标设备和保存文件名。

8, 单击“开始畚份”按钮,回弹出“备份作业信息”对话框,单击高级按钮,取消选顶标有“自动备份带有系统状态的系统保护文件”的复选框。如果选择会增大你备份的内容(在你只备份注册表的情况下)。

9, 单击“确定”,关闭“高级备份选项”复选框,然后单击“开始畚份”按钮。

确定后,程序开始备份,并在结束时可以查看备份状态的报表。

二,备份工具---备份到磁带或其他介质

这种方法过程比较简单,只需在备份树中选中System State ,你就可以进行备份或者使用在Backup的Welcome标签页上的自动系统恢复向导。利用选定的ASR(Automated System Recovery,自动系统恢复),导航器将创建三个备份集合,你只要依据向导就可以完成。

三,使用copy或xcopy进行备份

在Windows XP正在使用注册表时,是不能把当前注册表复制回去的,因此要使用copy或xcopy来修复注册表,就必须关闭Windows XP并启动另外一个诸如DOS,Windows 98/Me类的操作系统,或者第二个Windows XP。(建议你使用双系统,有关多系统的配置参见《Windows XP下的双引导配置》)。用copy或xcopy备份注册表比使用Backup工具还容易:

1, 运行Backup程序并创建ASR软盘

把在%SystemRoot%\Repair目录下找到你的注册表备份复制到另一个地方

2, 然后用xcopy复制%SystemRoot%\System32\Config目录下的当前所有的注册表文件。利用/c选项可使xcopy忽略错误(这是必须的,因为当前的注册表正在被使用。否则会出现错误)。

四,使用FAT时的备份方法

使用FAT文件系统的Windows XP用户通过用/sys选项格式化的软盘,可以方便的启动DOS或Windows 98/Me(如果用的是FAT32)。接着会显示DOS命令提示,可以方便的对硬盘进行读写。为了创建与FAT兼容的可引导软盘,只要使用Windows 98/Me或DOS的FORMAT命令加上/s系统选项即可。然后把有关xcopy的那些(xcopy*.*)也复制到该软盘用此软盘就可以在 Windows XP的机器上启动,并可以自由地访问该计算机上所有FAT格式的驱动器。在启动完成出现命令提示后,把那些注册表文件复制到安全的位置就只是很简单的任 务,可以复制到另外的一个硬盘上,几张软盘,ZIP盘上CD-R/CD-RW光盘或者其他支持的介质。

五,使用NTFS进行备份(建议不使用)

前面已经对NTFS有个很详细的介绍了。NTFS驱动器上的文件,只能由Windows XP来写,而其他的操作系统就不行。为了能够访问NTFS上的注册表文件,你必须安装第二个Windows XP。

六,使用RegEdit来畚份注册表

使用注册表编辑器(RegEdit),通过双击一个小图标就可以建立另一个注册表备份进行恢复。如果你 执行简单的主要步骤,就可以创建除了Security和SAM注册键以外的包括所有注册表内容的备份。下面的利用RegEdit技术可以备份 Security和SAM注册键:

1, 运行RegEdit。

2, 现在可以看到My Coputer处于高亮状态。

3, 选择Registry菜单内的Export Registry file选项。

4, 找到Desktop并且为此文件输入名字,然后点击Save按钮。

5, 退出RegEdit.

Windows XP中所提供的RegEdit版本是注册表文件作为 Unicode格式输出的。

要注意的是把你的备份文件放在安全的地方,这是特别重要的。

一盘在手杀毒无忧 DIY超完美杀毒闪盘

http://www.oldhand.org/articles/virus/tips/2007/0221/682.html

笔者不少朋友的爱机都中了病毒,请求笔者帮忙解决。为了更方便更有针对性地解决问题,笔者挑选了一些免费的杀毒工具制成一个非常实用的杀毒闪盘。插 上闪盘后,会出现一个自启动程序,根据不同的情况,选取相应的工具就可以帮系统“解毒”了。大家想不想也做一个?下面请随笔者一起来DIY吧。

  启动杀毒

  一般杀毒闪盘的做法,是利用杀毒软件的创建杀毒闪盘功能。如果系统中没装杀毒软件,又该怎办呢?

  其实,有些厂商提供了免费的DOS版杀毒程序。安博士的V3+Neo就是其中一款,它的最大优点就是“身材”小巧,病毒库更新速度快。

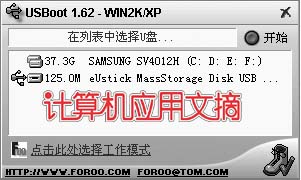
  首先要用闪盘驱动光盘中的格式化工具或USBoot制作启动型闪盘,在USBoot界面的列表中选择闪盘(图1)。

The image “/upimg/allimg/20070221/0042210.jpg” cannot be displayed, because it contains errors.

  选择ZIP工作模式,单击“开始”制作。完成后,将必要的启动文件和安博士DOS版复制到闪盘中,其中V3.exe是DOS下使用的扫描程序,Update.txt提供了升级后可查杀最新病毒的清单,*.v3d是杀毒引擎文件。

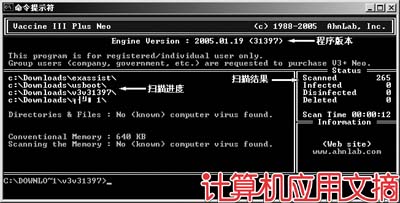
  启动电脑进入BIOS,打开“Advanced BIOS Features”选项,将“First Boot Device”设置为USB-ZIP启动。保存设置重启,即可实现闪盘启动。进入安博士的目录,执行“V3.exe C: /a/s/u/l:e”命令,发现病毒时,程序会通知用户并且自动清除。不足的是,如果遇到不能查杀的病毒,程序提供的处理方式不多,只有“是否删除文 件”,没有重命名或隔离病毒等功能(图2)。

The image “/upimg/allimg/20070221/0042211.jpg” cannot be displayed, because it contains errors.

  安博士每个工作日都会升级一次病毒库,重新下载文件后,将所有的*.v3d文件提取出来,覆盖原来的文件即可。

  另外,趋势科技也提供了免费的DOS杀毒程序,只是病毒库的体积较大。

  全面杀毒防毒

  使用闪盘拷贝文件,虽说方便,但也增加了病毒传播的风险,如果对方系统里没装杀毒软件,更难保证数据的安全性。幸好,McAfee为我们提供了 一个免费的SuperDAT杀毒程序,它由病毒库和扫描引擎组成,只要放入闪盘中,不仅可以对电脑文件进行检测,也能将病毒拒之于“盘”外。

  提取文件

  下载SuperDAT后,在命令行模式下进入其所在文件夹,运行“sdat****.exe /e”,将SuperDAT中的文件提取出来,该文件夹中会增加许多文件,包括病毒库scan.dat、扫描主程序scan.exe等。

XP几条实用的知识和技巧

1. WINXP设置文件安全
打开“我的电脑”选择菜单“工具”→“文件夹选项”,点击“查看”,在“高级设置”中取消“使用简单文件共享(推荐)”,便可以和win2000一样设置文件的安全性

2.关闭自动播放功能
1)“开始”→“运行”,在对话框中输入“gpedit.msc” →“计算机配置”→“管理模板”→“系统”,双击“关闭自动播放”,在“设置”中选“已启用”,确定即可。
2)每次插入U盘等,XP总要自动播放。把服务中的“Shell Hardware Detection”这一项禁用掉就可以了。


3.Winxp shutdown命令
shutdown.exe -a         取消关机
  shutdown.exe -f         强行关闭应用程序。
  shutdown.exe -m \计算机名   控制远程计算机。
  shutdown.exe -i         显示图形用户界面,但必须是Shutdown的第一个参数。     
  shutdown.exe -l         注销当前用户。
  shutdown.exe -r         关机并重启。
  shutdown.exe -t时间       设置关机倒计时。
  shutdown.exe -c"消息内容"    输入关机对话框中的消息内容(不能超127个字符)。
  
比如你的电脑要在23:00关机,可以选择“开始→运行”,输入“at 23:00 Shutdown -s”,这样,到了23点,电脑就会出现“系统关机”对话框,默认有30秒钟的倒计时并提示你保存工作。如果你想以倒计时的方式关机,可以输入 “Shutdown.exe -s -t 3600”,这里表示60分钟后自动关机,“3600”代表60分钟。

  如果想取消的话,可以在运行中输入“shutdown -a”。另外输入“shutdown -i”,则可以打开设置自动关机对话框,对自动关机进行设置。

  虽然shutdown.exe是Windows XP下的程序,在Windows2000中是调用Windows下System中的Shell32.dll文件来实现关机的,例如 “indirRunDLL32.exe indirSystemShell32.dll,SHExitWindowsEx 8”,但在Win2000也可利用它,方法如下:

  在WinXP安装目录下的System32文件夹中找到Shutdown.exe,将它复制到Win2000安装目录下的System32文件夹中,在“运行”中输入“Shutdown.exe”,即可像在Windows XP中一样使用该程序了。

Win XP 键盘快捷键

F1           显示当前程序或者windows的帮助内容。
F2           当你选中一个文件的话,这意味着“重命名”
F3           当你在桌面上的时候是打开“查找:所有文件” 对话框
F10或ALT        激活当前程序的菜单栏
windows键或CTRL+ESC   打开开始菜单
CTRL+ALT+删除     在win9x中打开关闭程序对话框
删除         删除被选择的选择项目,如果是文件,将被放入回收站
SHIFT+删除      删除被选择的选择项目,如果是文件,将被直接删除而不是放入回收站
CTRL+N         新建一个新的文件
CTRL+O         打开“打开文件”对话框
CTRL+P         打开“打印”对话框
CTRL+S         保存当前*作的文件
CTRL+X         剪切被选择的项目到剪贴板
CTRL+INSERT 或 CTRL+C  复制被选择的项目到剪贴板
SHIFT+INSERT 或 CTRL+V 粘贴剪贴板中的内容到当前位置

ALT+BACKSPACE 或 CTRL+Z 撤销上一步的*作
ALT+SHIFT+BACKSPACE   重做上一步被撤销的*作
 
Windows键+M       最小化所有被打开的窗口。
Windows键+CTRL+M    重新将恢复上一项*作前窗口的大小和位置
Windows键+E       打开资源管理器
Windows键+F       打开“查找:所有文件”对话框
Windows键+R       打开“运行”对话框
Windows键+BREAK     打开“系统属性”对话框
Windows键+CTRL+F    打开“查找:计算机”对话框
SHIFT+F10或鼠标右击   打开当前活动项目的快捷菜单
SHIFT          在放入CD的时候按下不放,可以跳过自动播放CD。在打开word的时候按下不放,可以跳过自启动的宏
 
ALT+F4         关闭当前应用程序
ALT+SPACEBAR      打开程序最左上角的菜单
ALT+TAB         切换当前程序
ALT+ESC         切换当前程序
ALT+ENTER        将windows下运行的MSDOS窗口在窗口和全屏幕状态间切换
PRINT SCREEN      将当前屏幕以图象方式拷贝到剪贴板
ALT+PRINT SCREEN    将当前活动程序窗口以图象方式拷贝到剪贴板
CTRL+F4         关闭当前应用程序中的当前文本(如word中)
CTRL+F6         切换到当前应用程序中的下一个文本(加shift 可以跳到前一个窗口)

在IE中:

ALT+RIGHT ARROW     显示前一页(前进键)
ALT+LEFT ARROW     显示后一页(后退键)
CTRL+TAB        在页面上的各框架中切换(加shift反向)
F5           刷新
CTRL+F5         强行刷新


  目的快捷键

  激活程序中的菜单栏 F10

  执行菜单上相应的命令 ALT+菜单上带下划线的字母

  关闭多文档界面程序中的当

  前窗口 CTRL+ F4

  关闭当前窗口或退出程序 ALT+ F4

  复制 CTRL+ C

  剪切 CTRL+ X

  删除 删除

  显示所选对话框项目的帮助 F1

  显示当前窗口的系统菜单 ALT+空格键

  显示所选项目的快捷菜单 SHIFT+ F10

  显示“开始”菜单 CTRL+ ESC

  显示多文档界面程序的系统

  菜单 ALT+连字号(-)

  粘贴 CTR L+ V

  切换到上次使用的窗口或者

  按住 ALT然后重复按TAB,

  切换到另一个窗口 ALT+ TAB

  撤消 CTRL+ Z 盘


二、使用“Windows资源管理器”的快捷键

  目的快捷键

  如果当前选择展开了,要折

  叠或者选择父文件夹左箭头

  折叠所选的文件夹 NUM LOCK+负号(-)

  如果当前选择折叠了,要展开

  或者选择第一个子文件夹右箭头

  展开当前选择下的所有文件夹 NUM LOCK+*

  展开所选的文件夹 NUM LOCK+加号(+)

  在左右窗格间切换 F6


三、使用 WINDOWS键

  可以使用 Microsoft自然键盘或含有 Windows徽标键的其他任何兼容键盘的以下快捷键。

  目的快捷键

  在任务栏上的按钮间循环 WINDOWS+ TAB

  显示“查找:所有文件” WINDOWS+ F

  显示“查找:计算机” CTRL+ WINDOWS+ F

  显示“帮助” WINDOWS+ F1

  显示“运行”命令 WINDOWS+ R

  显示“开始”菜单 WINDOWS

  显示“系统属性”对话框 WINDOWS+ BREAK

  显示“Windows资源管理器” WINDOWS+ E

  最小化或还原所有窗口 WINDOWS+ D

  撤消最小化所有窗口 SHIFT+ WINDOWS+ M


四、使用“我的电脑”和“Windows资源管理器”的快捷键

  目的快捷键

  关闭所选文件夹及其所有父

  文件夹按住 SHIFT键再单击“关闭按钮(仅适用于“我的电脑”)

  向后移动到上一个视图 ALT+左箭头

  向前移动到上一个视图 ALT+右箭头

  查看上一级文件夹 BACKSPACE


五、使用对话框中的快捷键

  目的快捷键

  取消当前任务 ESC

  如果当前控件是个按钮,要

  单击该按钮或者如果当前控

  件是个复选框,要选择或清

  除该复选框或者如果当前控

  件是个选项按钮,要单击该

  选项空格键

  单击相应的命令 ALT+带下划线的字母

  单击所选按钮 ENTER

  在选项上向后移动 SHIFT+ TAB

  在选项卡上向后移动 CTRL+ SHIFT+ TAB

  在选项上向前移动 TAB

  在选项卡上向前移动 CTRL+ TAB

  如果在“另存为”或“打开”

  对话框中选择了某文件夹,

  要打开上一级文件夹 BACKSPACE

  在“另存为”或“打开”对

  话框中打开“保存到”或

  “查阅” F4

  刷新“另存为”或“打开”

  对话框 F5


六、使用“桌面”、“我的电脑”和“Windows资源管理器”快捷键

  选择项目时,可以使用以下快捷键。

  目的快捷键

  插入光盘时不用“自动播放”

SHIFT插入 CD-ROM

  复制文件按住 CTRL拖动文件

  创建快捷方式按住 CTRL+SHIFT拖动文件

  立即删除某项目而不将其放入 SHIFT+删除

  “回收站”

  显示“查找:所有文件” F3

  显示项目的快捷菜单 APPLICATION键

  刷新窗口的内容 F5

  重命名项目 F2

  选择所有项目 CTRL+ A

  查看项目的属性 ALT+ ENTER或 ALT+双击

  可将 APPLICATION键用于 Microsoft自然键盘或含有 APPLICATION键的其他兼容键


七、Microsoft放大程序的快捷键

  这里运用Windows徽标键和其他键的组合。

  快捷键目的

  Windows徽标+PRINT SCREEN将屏幕复制到剪贴板(包括鼠标光标)

  Windows徽标+SCROLL LOCK将屏幕复制到剪贴板(不包括鼠标光标)

  Windows徽标+ PAGE UP切换反色。

  Windows徽标+ PAGE DOWN切换跟随鼠标光标

  Windows徽标+向上箭头增加放大率

  Windows徽标+向下箭头减小放大率

 
八、使用辅助选项快捷键

  目的快捷键

  切换筛选键开关右SHIFT八秒

  切换高对比度开关左ALT+左SHIFT+PRINT SCREEN

  切换鼠标键开关左ALT+左SHIFT+NUM LOCK

  切换粘滞键开关 SHIFT键五次

  切换切换键开关 NUM LOCK五秒

XP 运行菜单中的“快捷方式”

Computer management 计算机管理 : compmgmt.msc

Device manager 设备管理器 : devmgmt.msc

Disk management 磁盘管理 : diskmgmt.msc

Disk defrag 磁盘碎片整理程序: dfrg.msc

Event viewer 事件查看器 : eventvwr.msc

Shared folders 共享文件夹 : fsmgmt.msc

Group policies 组策略 : gpedit.msc

Local users and groups 本机用户和组 : lusrmgr.msc

Performance monitor 性能 : perfmon.msc

Local security settings 本地安全设置 : secpol.msc

Services 服务 : services.msc

Resultant set of policies 策略的结果集: rsop.msc

注册表禁用技巧

禁止使用“重置WEB设置”
   在HKEY_CURRENT_USER\Software\Policies\Microsoft\Internet Explorer\Control Panel下
   在右边的窗口中新建一个DWORD值“Connection Settings”,并设值为“1”。


禁止更改IE的连接设置
   在HKEY_CURRENT_USER\Software\Policies\Microsoft\Internet Explorer\Control Panel下
   在右边的窗口中新建一个DWORD值“Connection Settings”,并设值为“1”。


禁止更改IE的语言设置
   在HKEY_CURRENT_USER\Software\Policies\Microsoft\Internet Explorer\Control Panel下
   在右边的窗口中新建一个DWORD值“Languages”,并设值为“1”。


禁止更改IE的辅助功能设置
   在HKEY_CURRENT_USER\Software\Policies\Microsoft\Internet Explorer\Control Panel下
   在右边的窗口中新建一个DWORD值“Accessibility”,并设值为“1”。


禁止IE显示“工具”中“INTERNET选项”
   在HKEY_CURRENT_USER\Software\Microsoft\Windows\CurrentVersion\Policies\Explorer下
   在右边的窗口中新建一个二进制值“NoFolderOptions”,并设值为“01 00 00 00”。    


禁止使用鼠标右键
   在HKEY_CURRENT_USER\Software\Microsoft\Windows\CurrentVersion\Policies\Explorer下
   在右边的窗口中新建一个二进制值“NoViewContextMenu”,并设值为“01 00 00 00”。
   修改后需重新启动WINDOWS,启动后,你将不能在桌面,驱动器,文件夹等地方使用鼠标右键


禁止磁盘空间不足时的警告
   我们在安装软件的过程中,往往不能预料软件需要使用多大的磁盘空间,当空间不够的时候,
   就会弹出一个空间不足的警告框,使用以下方法就是避免出现这个对话框
   逐渐展开到HKEY_LOCAL_MACHINE\System\CurrentControlSet\Control\FileSystem下
   在右边的窗口中新建一个二进制值“DisableLowDiskSpaceBroadcast”,并设值为“FF FF FF FF”,
   如果想恢复出现这个警告框,只需删除此键。


禁止显示"远程管理"
   在HKEY_USERS\.DEFAULT\Software\Microsoft\Windows\CurrentVersion\Policies\System下
   在右边的窗口中新建一个DWORD值“NoAdminPage”,并设值为“1”。


禁止显示“注销”菜单
   在HKEY_USERS\.DEFAULT\Software\Microsoft\Windows\CurrentVersion\Policies\Explorer下
   在右边的窗口中新建一个二进制值“NoLogOff”,并设值为“01 00 00 00”。


禁止显示“开始”菜单中“收藏夹”菜单
   在HKEY_USERS\.DEFAULT\Software\Microsoft\Windows\CurrentVersion\Policies\Explorer下
   在右边的窗口中新建一个值“NoFavoritesMenu”,并设值为“1”。


禁止使用inf文件
   在HKEY_LOCAL_MACHINE\Software\CLASSES\.inf下
   在右边的窗口中更改“默认”值为“txtfile”


禁止使用reg文件
   在HKEY_LOCAL_MACHINE\Software\CLASSES\.reg下
   在右边的窗口中更改“默认”值为“txtfile”


禁用"打印机"中的"删除打印机"
   在HKEY_USERS\.DEFAULT\Software\Microsoft\Windows\CurrentVersion\Policies\Explorer
   下,在右边的窗口中新建DWORD值“NoDeletePrinter”,并设其值为“1”。


禁用"打印机"中的"添加打印机"
   在HKEY_USERS\.DEFAULT\Software\Microsoft\Windows\CurrentVersion\Policies\Explorer
   下,在右边的窗口中新建DWORD值“NoAddPrinter”,并设其值为“1”。


禁用“网络”控制面板
   在HKEY_USERS\.DEFAULT\Software\Microsoft\Windows\CurrentVersion\Network\System
   下,在右边的窗口中新建DWORD值“NoNetSetup”,并设其值为“1”。


禁用“用户”控制面板
   在HKEY_USERS\.DEFAULT\Software\Microsoft\Windows\CurrentVersion\Policies\System
   下,在右边的窗口中新建DWORD值“NoProfilePage”,并设其值为“1”。


禁用“密码”控制面板
   在HKEY_USERS\.DEFAULT\Software\Microsoft\Windows\CurrentVersion\Policies\System
   下,在右边的窗口中新建DWORD值“NoSecCPL”,并设其值为“1”。


禁止修改开始菜单
   在HKEY_CURRENT_USER\Software\Microsoft\Windows\CurrentVersion\Policies\Explorer下
   在右边的窗口中创建一个DOWRD值:"NoChangeStartMenu",并将其值设为“1”。


禁止修改“控制面版”
   在HKEY_CURRENT_USER\Software\Microsoft\Windows\CurrentVersion\Policies\Explorer下
   在右边的窗口中新建一个二进制"NoSetFolders",并将其值设为"01 00 00 00"。


禁止快速启动
   在HKEY_LOCAL_MACHINE\System\CurrentControlSet\Control\Shutdown下
   在右边的窗口中修改一个字符串值:“FastReboot”,并将其值设为“0”。


在退出WINDOWS时清除“文档”中的记录
   在HKEY_CURRENT_USER\Software\Microsoft\Windows\CurrentVersion\Policies\Explorer下
   在右边的窗口中新建一个二进制"ClearRecentDocsonExit",并将其值设为"01 00 00 00"。


不允许按ESC取消登录
   在HKEY_LOCAL_MACHINE\Network\Logon下
   在右边的窗口中创建一个DOWRD值:“MustBeValidated”,并将其值设为“1”,并且在在“网络”
   属性里设置为“Windows友好登录”。


禁止使用注册表编辑文件regedit.exe
   HKEY_USERS\.DEFAULT\Software\Microsoft\Windows\CurrentVersion\Policies\System
   在右边的窗口中创建一个DOWRD值:"DisableRegistryTools",并将其值设为“1”。


恢复使用注册表编辑文件regedit.exe
   当我们禁止使用注册表文件后,想恢复不是一件难事,下载这个文件,运行把注册表信息添加
   到注册表,重新启动后即可使用注册表编辑器regedit.exe


禁止更改控制面板和打印机
   HKEY_CURRENT_USER\Software\Microsoft\Windows\CurrentVersion\Policies\Explorer
   在右边的窗口中创建一个DOWRD值:“NoSetFolders”,并将其值设为“1”。


禁止修改显示属性
   HKEY_CURRENT_USER\Software\Microsoft\Windows\CurrentVersion\Policies\System
   在右边的窗口中创建一个DOWRD值:“NoDispCPL”,并将其值设为“1”。


隐藏我的电脑中的驱动器
   隐藏所有驱动器:HKEY_CURRENT_USER\Software\Microsoft\Windows\CurrentVersion\Policies\Explorer
   在右边的窗口中创建一个DWORD值:“NoDrives”,并将其值设为“FFFFFFFF”;
   

隐藏E盘:HKEY_CURRENT_USER\Software\Microsoft\Windows\CurrentVersion\Policies\Explorer
   在右边的窗口中创建一个DWORD值:“NoDrives”,并将其值设为“10”;
   

隐藏D盘:HKEY_CURRENT_USER\Software\Microsoft\Windows\CurrentVersion\Policies\Explorer
   在右边的窗口中创建一个DWORD值:“NoDrives”,并将其值设为“8”;
   

隐藏C盘 :HKEY_CURRENT_USER\Software\Microsoft\Windows\CurrentVersion\Policies\Explorer
   在右边的窗口中创建一个DWORD值:“NoDrives”,并将其值设为“4”。
   

隐藏A盘 :HKEY_CURRENT_USER\Software\Microsoft\Windows\CurrentVersion\Policies\Explorer
   在右边的窗口中创建一个DWORD值:“NoDrives”,并将其值设为“1”。


退出不保存设置
   HKEY_USERS\.DEFAULT\Software\Microsoft\Windows\CurrentVersion\Policies\Explorer
   把二进制值“NoSaveSettings”改为“01 00 00 00”。


禁用MS—DOS方式
   HKEY_CURRENT_USER\Software\Microsoft\Windows\CurrentVersion\Policies\Explorer
   在该分支下新建主键“WinOlaApp",然后点击该主键,在右边的窗口中创建一个DWORD值“Disabled",
   并设其值为“1”。


禁止“重新启动计算机切换到MS-DOS方式”
   HKEY_CURRENT_USER\Software\Microsoft\Windows\CurrentVersion\Policies\Explorer
   在右边的窗口中创建一个DWORD值“NoRealMode”,并设其值为“1”。


在“我的电脑”中显示“计划任务”
  HKEY_LOCAL_MACHINE\Software\Microsoft\Windows\CurrentVersion\explorer\MyComputer\NameSpace
   在该分支下创建一个主键“{D6277990-4C6A-11CF-8D87-00AA0060F5BF}”,在右边的窗口中创建字符串
  “默认”,设值为“Scheduled Tasks”。


在“我的电脑”中显示“拨号网络”    

HKEY_LOCAL_MACHINE\Software\Microsoft\Windows\CurrentVersion\explorer\MyComputer\NameSpace
   在此分支下新建一个主键“{992CFFA0-F557-101A-88EC-00DD010CCC48}”,单击此主键,
   在右边的窗口中创建一个字符串值:“默认”,并设值为"拨号网络"。


在我的电脑中显示“打印机”
  HKEY_LOCAL_MACHINE\Software\Microsoft\Windows\CurrentVersion\explorer\MyComputer\NameSpace
   在此分支下新建一个主键“{2227A280-3AEA-1069-A2DE-08002B30309D}”,单击此主键,
   在右边的窗口中创建一个字符串值:“默认”,并设值为“打印机”。


禁止PC在出错时发出声音
   HKEY_CURRENT_USER\Control Panel\Sound
   在右边的窗口中,把字符串“Beep”的值改为“No”。


禁止CD-ROM自动运行
   HKEY_LOCAL_MACHINE\SYSTEM\CurrentControlSet\Services\CDRom
   在右边的窗口中,把DWORD值“Autorun”改为“0”。“1”表示自动运行。


禁止改变打印机设置
   HKEY_CURRENT_USER\Software\Microsoft\Windows\CurrentVersion\Policies\Explorer
   在右边窗口中创建DWORD值:“NoPrinters”,并设值为“1”。


禁止出现“点击这里开始”的提示
   HKEY_CURRENT_USER\Software\Microsoft\Windows\CurrentVersion\Policies\Explorer
   在右边的窗口中新建一个二进制值:“NoStartBanner”,设值为“01 00 00 00”。


在桌面上显示WINDOWS版本标志
   HKEY_USERS\.DEFAULT\Control Panel\desktop
   在右边的窗口中新建一个字符串值:“PaintDesktopVersion”,并设其值为“1”。


禁止在桌面上显示图标
   我们安装了许多软件后,往往会在系统的桌面上出现许多图标,点击这些图标可以启动相应的软件程,
   过多的图标使桌面变得花花绿绿,想恢复原来清洁的桌面,又不想删除这些图标,就可以使用一下的方
   法,把桌面上的所有图标都隐藏起来。
   在HKEY_USERS\.DEFAULT\Software\Microsoft\Windows\CurrentVersion\Policies\Explorer下
   在右边的窗口中新建一个DWORD值:“NoDestop”,并设其值为“1”。


禁止显示提示
   当我们把鼠标指向“我的电脑”,“我的文件夹”,“回收站”等图标时往往会出现一些提示信息,这些信息对一个熟悉WINDOWS的操作者来讲,是不必要的,我们想禁止显示这些提示,可使用下面的方法。
   在HKEY_USERS\.DEFAULT\Software\Microsoft\Windows\CurrentVersion\Explorer\Advanced下
   在右边的窗口中修改DWORD值“ShowInfoTip”,设其值为“0”。


禁止使用任务栏
   在HKEY_CURRENT_USER\Software\Microsoft\Windows\CurrentVersion\Policies\Explorer下
   在右边的窗口中新建一个DWORD值:“NoSetTaskBar”,并设其值为“1”。
   此条技巧的作用是当我们在系统的任务栏上点击鼠标右键,再选择“属性”时,将会出现以下的提示信息:
  “本次操作由于这台计算机的限制而被取消。请与你的系统管理员联系”。


高彩色显示图标
   当我们按照完windows后,windows的图标都是用位数较小的色彩来显示图标的,使用下面的方法可以用
   16位色显示图标,运行注册表编辑器,依次展开到HKEY_CURRENT_USER\ControlPanel\Desktop\WindowMetrics
   在右边的窗口中找到字符串值:“Shell Icon BPP”,并设其值为“16”。


改变图标大小
   HKEY_CURRENT_USER\Control Panel\Desktop\WindowMetrics
   在右边的窗口中找到字符串值:“Shell Icon Size”,改变其值即改变图标大小,缺省值为“32”。


进入WINDOWS98时显示欢迎提示
   HKEY_LOCAL_MACHINE\Software\Microsoft\Windows\CurrentVersion\Run
   在右边的窗口中新建一个字符串值:“Welcome”,设值为“Welcome.exe /R”。


以12小时制显示时间
   HKEY_USERS\.DEFAULT\Control Panel\International
   在右边的窗口中找到字符串值:“sTimeFormat”,改其值为“h:mm tt”。


隐藏快捷方式的小箭头
   HKEY_LOCAL_MACHINE\SOFTWARE\Microsoft\Windows\CurrentVersion\Explorer\Shell Icons
   在右边的窗口中新建字符串值:“29”,设置其值为:“%WINDIR%\SYSTEM\docprop.dll,1”。


把快捷方式的小箭头更改为其它图标
   HKEY_LOCAL_MACHINE\Software\Microsoft\Windows\CurrentVersion\explorer\Shell Icons
   新建或修改字符串"29",设置其值为你的图标路径。


为快捷方式的图标加上小箭头
   去掉了小箭头,怎么办,别急,按以下办法可以做上
   HKEY_LOCAL_MACHINE\Software\Microsoft\Windows\CurrentVersion\explorer\Shell Icons
   在右边窗口中删除字符串"29"。


禁止名称有“快捷方式”四个字
   HKEY_CURRENT_USER\Software\Microsoft\Windows\CurrentVersion\Explorer
   在右边的窗口中新建一个二进制值“link”,并设其值为“00 00 00 00”。


使用三键鼠标
   在HKEY_LOCAL_MACHINE\SOFTWARE\Logitech\ouseWare\CurrentVersion \SerialV \0000下 ,
   改为DoubleClick to 001。


更改WINDOWS系统的产品名
   在HKEY_LOCAL_MACHINE\Software\Microsoft\Windows\CurrentVersion下
   在右边的窗口中找到字符串值“ProductName”,更改键值即可。打开系统属性看看效果


更改WINDOWS系统的用户名
   在HKEY_LOCAL_MACHINE\Software\Microsoft\Windows\CurrentVersion下
   在右边的窗口中找到字符串值“RegisteredOwner”,更改键值即可。打开系统属性看看效果。
 

清除配色方案
   在HKEY_CURRENT_USER\Control Panel\Appearance\Schemes下,
   窗口的右边会出现系统自带的各种配色方案,将你认为无用的配色方案删除掉,一般只保留“Windows默认”一项。


禁止打开任何文件夹
   在HKEY_CLASSES_ROOT\Folder\shell\open\ddeexec下,
   在右边的窗口中修改字符串:“(默认)”的值设为“rem [ViewFolder("%l", %I, %S)]”;
   同时在HKEY_CLASSES_ROOT\Folder\shell\explore\ddeexec下
   在右边的窗口中修改字符串:“(默认)”的值设为“rem [ViewFolder("%l", %I, %S)]”。


自动关闭电源
   在HKEY_LOCAL_MACHINE\SOFTWARE\Microsoft\WindowsNT\CurrentVersion\Winlogon下,
   在右边的窗口中创建一个DWORD值:“PowerdownAfter Shutdown”,并将其值设为“1”。


允许强制关闭系统
   在我们运行程序的时候,有时会遇到软件程序没反映的现象,于是我们按CTRL+ALT+DEL来关闭系统,
   而当我们按下后,系统会叫我们退出前要使软件程序退出,使用本功能可允许强制关闭系统。
   在HKEY_USERS\.DEFAULT\ControlPanel\desktop下,在右边的窗口中创建一个字符串值:“AutoEndTask s”,并将其值设为“1”。


禁止光标闪动
   在HKEY_USERS\.DEFAULT\Control Panel\desktop下
   在右边的窗口中创建一个字符串值:“CursorBlinkRate”,并将其值设为“-1”。


删除“查找”命令保留在注册表中的搜索结果
   在HKEY_USERS\.DEFAULT\Software\Microsoft\Windows\CurrentVersion\Explorer\Doc Find Spec MRU 下删除右边窗口中的键。


进入Win98前给出警告信息
   在HKEY_LOCAL_MACHINE\Software\Microsoft\Windows\CurrentVersion\Winlogon下
   键值:″LegalNoticeCaption″=″问候″
   说明:这是信息框的标题。
   键值:″LegalNoticeText″=″欢迎光临″ 说明:这是信息框的文本内容。


WINDOWS98登录口令
   HKEY_LOCAL_MACHINE\Network\Logon
   在右边的窗口中创建一个DOWRD值:"MustBeValidated",并将其值设为“1”,在启动WINDOWS98后
   按ESC键将不能显示画面。


开机时进行“多用户登录”选择
   在HKEY_LOCAL_MACHINE\Network\Logon下
   在右边的窗口中创建一个DOWRD值:“UserProfiles”,并将其值设为“1”。


开机时自动登录系统
   在HKEY_LOCAL_MACHINE\Software\Microsoft\Windows\CurrentVersion\Winlogon下
   在右边的窗口中创建字符串值:“AutoAdminLogon”,并将其值设为“1”;还创建字符串值“DefaultP assword”,其值为登录时的密码,创建字符串值:“DefaultUserName”,其值为登录时
   所用的用户名。对单机用户有意义。


自动更新
   HKEY_LOCAL_MACHINE\System\CurrentControlSet\Control\Update
   把二进制值“UpdateMode”改为“00 00 00 00”。


鼠标自动激活当前窗口
   HKEY_USERS\.DEFAULT\Control Panel\desktop
   把二进制值“UserPreferencemask”改为“AF 00 00 00”。


查看安装时输入的WIN98密码
   HKEY_LOCAL_MACHINE\Software\Microsoft\Windows\CurrentVersion
   点击“ProductKey”,即可看到。


改变WINDOWS有关文件的安装路径
   HKEY_LOCAL_MACHINE\Software\Microsoft\Windows\CurrentVersion\Setup
   在右边的窗口中,有“BootHost”、“BootDir”、“SourcePath”、“MediaPath”.....
   改变其数据内容,就可改变相关文件的路径。


设立缺省的用户名和公司名称
   HKEY_CURRENT_USER\Software\Microsoft\MS Setup (ACME)\User Info
   在右边窗口中找到字符串值:“DefCompany”,“DefName”,DefCompany是指公司名称,
   DefName是指用户名。


注册你的WINDOWS98。
   HKEY-LOCAL-MACHINE\SOFTWARE\Miscrosoft\Windows\CurrentVersion\
   在右边的窗口中将“Regdone”的值改为“1”。


自动运行光碟
   HKEY_USERS\.DEFAULT\Software\Microsoft\Windows\CurrentVersion\Policies\Explorer
   在右边的窗口中创建一个二进制值:“NoDriveTypeAutoRun”,并将其值设为“95 00 00 00”
   想禁止自动运行,只需改为"b5 00 00 00"。


自动播放光碟
   在HKEY_CLASSES_ROOT\AudioCD\shell下
   在右边的窗口中修改字符串值:“默认”,改其值为空格。


直接显示图片内容
   HKEY_CLASSES_ROOT\Paint. Picture\DefaultIcon
   在右边的窗口中,找到字符串“默认”,修改值为“%1”。


添加或删除启动时自动运行的程序
   在HKEY_LOCAL_MACHINE\Software\Microsoft\Windows\CurrentVersion\下,把鼠标点击“RUN”,
   在右边的窗口中,按相应的方法添加或删除启动时自动运行的程序。
 

过滤IP(适用于WIN2000)
   在HKEY_LOCAL_MACHINE\System\CurrentControlSet\Services\Tcpip\Parameters下
   在右边的窗口中修改双字节“EnableSecurityFilters”的值为“1”。


禁止显示IE的地址栏
   在HKEY_CLASSES_ROOT\CLSID\{01E04581-4EEE-11d0-BFE9-00AA005B4383}\InProcServer32下
   在右边的窗口中修改字符串“默认”的值为“rem C:\WINDOWS\SYSTEM\BROWSEUI.DLL”。


禁止使用IE“internet选项”中的高级项(winnt适用)
   在HKEY_CURRENT_USER\Software\Policies\Microsoft\Internet Explorer\Control Panel下
   在右边的窗口中新建一个DWORD值“AdvancedTab”,并设值为“1”。


禁止更改IE默认的检查(winnt适用)
   在HKEY_CURRENT_USER\Software\Policies\Microsoft\Internet Explorer\Control Panel下
   在右边的窗口中新建一个DWORD值“ProgramsTab”,并设值为“1”。


允许DHCP(winnt适用)
   在HKEY_LOCAL_MACHINE\SYSTEM\CurrentControlSet\Services\{Adapter}\Parameters\Tcpip下
   在右边的窗口中新建一个DWORD值“EnableDHCP”,并设值为“1”。


局域网自动断开的时间(winnt适用)
   在HKEY_LOCAL_MACHINE\SYSTEM\CurrentControlSet\Services\LanmanServer\Parameters下
   在右边的窗口中新建一个DWORD值“Autodisconnect”,并设值为你想要设置的分钟数。


禁止使用“重置WEB设置”
   在HKEY_CURRENT_USER\Software\Policies\Microsoft\Internet Explorer\Control Panel下
   在右边的窗口中新建一个DWORD值“Connection Settings”,并设值为“1”。


禁止更改IE的连接设置
   在HKEY_CURRENT_USER\Software\Policies\Microsoft\Internet Explorer\Control Panel下
   在右边的窗口中新建一个DWORD值“Connection Settings”,并设值为“1”。


使打开IE时候,窗口最大化
   在HKEY_CURRENT_USER\Software\Microsoft\Internet Explorer\Main\ 下
   在右边的窗口中删除Window_Placement,并且
   在HKEY_CURRENT_USER\Software\Microsoft\Internet Explorer\Desktop\Old WorkAreas 下
   在右边的窗口中删除OldWorkAreaRects 。


禁止更改IE的语言设置
   在HKEY_CURRENT_USER\Software\Policies\Microsoft\Internet Explorer\Control Panel下
   在右边的窗口中新建一个DWORD值“Languages”,并设值为“1”。


禁止更改IE的辅助功能设置
   在HKEY_CURRENT_USER\Software\Policies\Microsoft\Internet Explorer\Control Panel下
   在右边的窗口中新建一个DWORD值“Accessibility”,并设值为“1”。


禁止IE显示“工具”中“INTERNET选项”
   在HKEY_CURRENT_USER\Software\Microsoft\Windows\CurrentVersion\Policies\Explorer下
   在右边的窗口中新建一个二进制值“NoFolderOptions”,并设值为“01 00 00 00”。


清理IE网址列表
   HKEY_CURRENT_USER\Software\Microsoft\Internet Explorer\TypedURLs
   在右边的窗口中删除想要删除的网址。


禁止使用代理服务器
   代理服务器的用途很大,比如可以使原来只能国内站点的电脑,在使用代理服务器后,能访问国外站点
   但代理服务器的使用也会带来不利的地方,因此,我们可以通过注册表来禁止使用代理服务器,
   在HKEY_LOCAL_MACHINE\Config\0001\Software\Microsoft\windows\CurrentVersion\Internet Settings下
   在右边的窗口中新建二进制值“ProxyEnable”的键值为"00 00 00 00"。


在IE中禁止显示工具栏
   在 HKEY_USERS\.DEFAULT\Software\Microsoft\Internet Explorer\Main 下
   在右边的窗口中修改字符串“Show_URLToolBar”的键值为"no"。


在IE中禁止显示状态栏
   在 HKEY_USERS\.DEFAULT\Software\Microsoft\Internet Explorer\Main 下
   在右边的窗口中修改字符串“Show_StatusBar”的键值为"no"。


更改"应用程序"的文件夹的路径在HKEY_USERS\.DEFAULT\Software\Microsoft\Windows\CurrentVersion\Explorer\User Shell Folders
   下,在右边的窗口中修改字符串“Recent”的键值为新的文件夹路径,如:C:\cpu ,注意:cpu这个文件 夹必须是存在的,否则新建一个文件夹。


更改"应用程序数据"的文件夹路径在HKEY_USERS\.DEFAULT\Software\Microsoft\Windows\CurrentVersion\Explorer\User Shell Folders
   下,在右边的窗口中修改字符串“AppData”的键值为新的文件夹路径。


为同一部电脑设置2个IP地址
   在HKEY_LOCAL_MACHINE\System\CurrentControlSet\Services\Class\NetTrans下
   点击0000、0001,0002.....留意右边的窗口,当你发现右边窗口中的字符串"DriverDesc"的值
   为"TCP/IP",修改同一窗口中的字符串"IPAddress"和"IPMask",把IPAddress设为IP地址
   如"198.0.1.9,198.0.1.7",把"IPMask"设为对应的掩码,如"255.255.255.0,255.255.255.0"


更改Internet Explorer的标题
   在HKEY_CURRENT_USER\Software\Microsoft\Internet Explorer\Main下
   在右边的窗口中新建字符串值“Window Title”为新标题的名字。


更改outlook express的标题
    在HKEY_CURRENT_USER\Identities\{44453E40-8AFB-11D4-9E02-B0A2A20F384F}\ Software\Microsoft\Ou tlook Express\5.0下,在右边的窗口中新建字符串值“WindowTitle”为新的标题 名字。{}里的内容不一定相同。


改变“超级链接”处点击前后的颜色
   在HKEY_CURRENT_USER\Software\Microsoft\Internet Explorer\Settings下
   在右边的窗口中修改“Anchor Color”和“Anchor Color Visited”的值即可修改
   修改点击前后的颜色。


清理访问“网络邻居”后留下的字句信息
   在HEKY_CURRENT_USER/Network/Recent下
   删除下面的主键。


加快上网速度
   以下有几项方法可以改变上网速度:
   HKEY_LOCAL_MACHINE\System\CurrentControlSet\Services\VxD\MSTCP
   在右边的窗口中把“DefaultRcvWindow”的值改为“6400”,把“DefaultTTL”改为“128”。
   HKEY_LOCAL_MACHINE\System\CurrentControlSet\Services\Class\NetTrans
   在右边窗口中创建字符串值“MaxMTU”,“MaxMSS”,并设“MaxMTU”为“576”,设“MaxMSS”
   为“536”。


禁止使用网上邻居
   在 KEY_USERS\.DEFAULT\Software\Microsoft\Windows\CurrentVersion\Policies\Explorer下
   在右边窗口中创建DWORD值“NoNetHood”,并设为“1”。


改变和增加IE自动搜索的顺序
   在HKEY_LOCAL_MACHINE\Software\Microsoft\Internet Explorer\Main\UrlTemplate下
   在右边窗口中,我们可以看到有几个字符串,IE按照1,2,3,4....的顺序进行自动搜索,调整1,2,
   3,4...字符串的键值互相交换,即可调整自动搜索的顺序,亦可新建字符串,增加自动搜索的内容。


在“开始”菜单中增加“网上邻居” 在HKEY_LOCAL_MACHINE\Software\Microsoft\Windows\CurrentVersion\explorer\NetworkNeighborhood
   下新建主键“NameSpace”,然后在    HKEY_USERS\.DEFAULT\Software\Microsoft\Windows\CurrentVersion\Explorer\MenuOrder\StartMenu\
   下新建主键“网上邻居”。


禁止在"控制面板"中显示"网络"属性
   在HKEY_USERS\.DEFAULT\Software\Microsoft\Windows\CurrentVersion\Policies\Explorer下
   在右边的窗口中新建DWORD值“NoNetSetup",并设其值为“1”。


禁止在“网络”中显示“标识”属性
   在HKEY_USERS\.DEFAULT\Software\Microsoft\Windows\CurrentVersion\Policies\Network下
   在右边的窗口中新建DWORD值“NoNetSetupIDPage”,并设其值为“1”。


禁止在“网络”中显示“整个网络”属性
   在HKEY_USERS\.DEFAULT\Software\Microsoft\Windows\CurrentVersion\Policies\Network下
   在右边的窗口中新建DWORD值“NoEntireNetwork”,并设其值为“1”。


更改IE的缓冲的路径
   在HKEY_USERS\.DEFAULT\Software\Microsoft\Windows\CurrentVersion\Explorer\User Shell Folders 下更改“Cache”的路径即可。

  改变下载的路径
   在HKEY_USERS\.DEFAULT\Software\Microsoft\Internet Explorer下
   在右边的窗口中新建DWORD值“Download Directory”,并设其值为你想要的下载路径,如C:\My Documents。


禁止查找用户
   在HKEY_LOCAL_MACHINE\Software\Microsoft\Windows\CurrentVersion\ explorer\FindExtensions\Stat ic\WabFind下,删除主键“WabFind”。


改变收藏夹、Cookies、启动、历史记录的路径
    在HKEY_USERS\.DEFAULT\Software\Microsoft\Windows\CurrentVersion\ Explorer\User Shell Folders 下找到字符串值“Favorites”,并设其值为你想要的下载路径,如C:\WINDOWS \Favorite。
   在此窗口中可更改桌面的路径、Cookies的路径、启动的路径、历史记录的路径。

  创建"拨号网络"在开始菜单中
   打开任务栏和开始菜单,选择“高级”,在右边的窗口中新建文件夹
  “拨号网络.{992CFFA0-F557-101A-88EC-00DD010CCC48}”。


网址URL的调整
    我们在使用IE上网时输入的网址,会在注册表里面留下一些记录,记录着你输入过那些网址,当你下次再输入该网址时,只需输入几个字母,IE就会自动的 输入完整的网址,大大方便了我们,在以下的方法中,我们可以手动的在WINDOWS的注册表中增加一些网址URL,使上网时更方便。
   依次展开在HKEY_CURRENT_USER\Software\Microsoft\Internet Explorer\TypedURLs下
   在右边的窗口中按url1、url2、url3......顺序排列着一些URL,修改,增加,删除这些url的值
   即可达到修改,增加,删除URL的功能。


取消登录时选择用户
   已经删除了所有用户,但登录时还要选择用户,我们要取消登录时选择用户,就要
   在HKEY_LOCAL_MACHINE\Network\Logon下,在右边的窗口中,修改"UserProfiles"值为"0"。
   重新启动WINDOWS,使这条技巧生效。


隐藏上机用户登录的名字
   在HKEY_LOCAL_MACHINE\Software\Microsoft\Windows\CurrentVersion\Winlogon下
   在右边的窗口中新建字符串"DontDisplayLastUserName",设值为"1"。


显示“频道栏”
   在HKEY_CURRENT_USER\Software\Microsoft\Internet Explorer\Main下
   在右边的窗口中修改字符串"Show_ChannelBand"为"yes"。
 

增加键盘的缓冲(适用于WIN2000)
   依次打开至HKEY_LOCAL_MACHINE\System\CurrentControlSet\Services\Kbdclass\Parameters下,
   在右边窗口中修改“KeyboardDataQueueSize”的值为你想要的缓存大小。


增加鼠标缓冲区(适用于WIN2000)
   依次打开至HKEY_LOCAL_MACHINE\System\CurrentControlSet\Services\Kbdclass\Parameters下,
   在右边窗口中创建“MouseDataQueueSize”的双字节值,并设其值为你想要的缓存区大小。

  在WINDOWS2000启用UDMA66的功能(适用于WIN2000)
    依次打开至HKEY_LOCAL_MACHINE\System\CurrentControlSet\Control\Class\ {4D36E96A-E325-11CE-BFC 1-08002BE10318}\0000下,在右边窗口中创建“EnableUDMA66”的双字节 值,并设其值为“1”。


启用CPU的二级缓存(适用于WIN2000)
   在HKEY_LOCAL_MACHINE\System\CurrentControlSet\Control\SessionManager\Memory Management下
   在右边窗口中,我们可以更改“SecondLevelDataCache”的数值为CPU设置相应的数据。


调整“帝国时代”游戏的速度
   在HKEY_USERS\.Default\Software\Microsoft\Games\Age of Empires\1.00下
   在右边窗口中,我们可以看到“Game speed”的数值就是速度大小。


硬盘读取“星际”游戏
   现在星际非常流行,但大家是否觉得星际用光盘太麻烦,我现在就介绍一种通过修改注册表来实现硬盘


读取游戏的方法:
   1:安装星际
   2:打开注册表编辑器
   3:找到子键HKEY_LOCAL_MACHINE\Software\Blizzard Entertainment\starcraft在右边窗口中找到InstallPath,
    如果键值是E:\……,就把E该为本地硬盘驱动器就行了。

  找回FLASH的序列号SN
   在HKEY_LOCAL_MACHINE\Software\Macromedia\Flash\4\Registration\Serial Number 下
   在右边窗口中,我们可以看到“默认”的数值就是FLASH的序列号

  找回DREAMWEAVER3的序列号SN
   想重装DREAMWEAVER,但不记得序列号了,怎么办?别急,按下面做就可找会DREAMWEAVER3的SN
   在 HKEY_LOCAL_MACHINE\Software\Macromedia\Dreamweaver\3\Registration 下
   在右边窗口中,我们可以发现键名为"Serial Number"的字符串,其数据就是DREAMWEAVER的序列号

  “红心接龙”游戏作弊
   在HKEY_USERS\.DEFAULT\Software\Microsoft\Windows\CurrentVersion\Applets\Hearts下
   在右边窗口中新建字符串"zb",设其值为"42"。

  隐藏输入的密码
   在HKEY_LOCAL_MACHINE\Software\Microsoft\Windows\CurrentVersion\Policies\Network下
   在右边窗口中新建DWORD值"HideSharePwds",设其值为"1"。

  优化硬盘驱动器
   在HKEY_LOCAL_MACHINE\System\CurrentControlSet\Control\FileSystem下
   在右边的窗口中创建二进制值"NameCache",NameCache是文件名缓存,32MB系统建议值为800000,
   64MB系统建议值为0F00000;PathCache是路径缓存,32MB系统建议为008000,64MB系统建议为0F0000。

  超频Trident Imagine 9750系列显卡
   在HKEY_LOCAL_MACHINE\SOFTWARE\Trident Microsystems下
   找到文件夹“D3DPerformance”,修改“D3DPerf”为5或7,修改“CkBlinerOn”为2,

  改变最大图标缓冲
   HKEY_LOCAL_MACHINE\Software\Microsoft\Windows\CurrentVersion\explorer
   在右边的窗口中找到字符串值:“Max Cached Icons”,设其值为“7500”。

  清除“开始”中的“运行”的历史记录
   HKEY_CURRENT_USER\Software\Microsoft\Windows\CurrentVersion\Explorer\RunMRU
   删除右边窗口中的“a,b,c,d.....”,即可删除历史记录。

  优化软盘驱动器的性能
   HKEY_LOCAL_MACHINE\System\CurrentControlSet\Services\Class\fdc\0000
   在右边的窗口中创建一个字符串值:“ForceFIFO”,设值为“0”。

  优化文件系统
   HKEY_LOCAL_MACHINE\System\CurrentControlSet\Control\FileSystem
   在右边的窗口中创建一个DWORD值:“ConfigFileAllocSize”,并设为“1f4”。

  加快上网速度
   以下有几项方法可以改变上网速度:
   HKEY_LOCAL_MACHINE\System\CurrentControlSet\Services\VxD\MSTCP
   在右边的窗口中把“DefaultRcvWindow”的值改为“6400”,把“DefaultTTL”改为“128”。
   HKEY_LOCAL_MACHINE\System\CurrentControlSet\Services\Class\NetTrans
   在右边窗口中创建字符串值“MaxMTU”,“MaxMSS”,并设“MaxMTU”为“576”,设“MaxMSS”
   为“536”。

  巧解IE的分级审查口令
   首先备份注册表文件,然后通过运行regedit来打开注册表。
   定位到HKEY_LOCAL_MACHINE\SOFTWARE\Microsoft\Windows\CurrentVersion\Policies\Ratings,
   用鼠标选中右半窗口里的名称记录,按下Del键进行删除。退出注册表,然后重新启动,就可以解开分级审查的口令了。
  更改网络工作组图标
   在HKEY_LOCAL_MACHINE\Software\Microsoft\Windows\CurrentVersion\explorer\Shell Icons下
   在右边的窗口中新建字符串值"2",并设其值为新图标的路径。

  更改WEB文件夹图标
   HKEY_LOCAL_MACHINE\Software\CLASSES\CLSID\{BDEADF00-C265-11D0-BCED-00A0C90AB50F}\DefaultIc,
   在右边的窗口中修改"默认"为新图标的路径。

  更改DOS程序的图标
   在HKEY_LOCAL_MACHINE\Software\Microsoft\Windows\CurrentVersion\explorer\Shell Icons
   下,在右边的窗口中新建字符串值"2",并设其值为新图标的路径。

  更改5寸软盘的图标
   在HKEY_LOCAL_MACHINE\Software\Microsoft\Windows\CurrentVersion\explorer\Shell Icons
   下,在右边的窗口中新建字符串值"5",并设其值为新图标的路径。

  更改可移动驱动器的图标
   在HKEY_LOCAL_MACHINE\Software\Microsoft\Windows\CurrentVersion\explorer\Shell Icons
   下,在右边的窗口中新建字符串值"5",并设其值为新图标的路径。

  更改"注销"的图标
   在HKEY_LOCAL_MACHINE\Software\Microsoft\Windows\CurrentVersion\explorer\Shell Icons
   下,在右边的窗口中新建字符串值"44",并设其值为新图标的路径。

  更改"运行"的图标
   在HKEY_LOCAL_MACHINE\Software\Microsoft\Windows\CurrentVersion\explorer\Shell Icons
   下,在右边的窗口中新建字符串值"24",并设其值为新图标的路径。

  更改"关闭系统"的图标
   在HKEY_LOCAL_MACHINE\Software\Microsoft\Windows\CurrentVersion\explorer\Shell Icons
   下,在右边的窗口中新建字符串值"27",并设其值为新图标的路径。

  更改"收藏夹"的图标
   在HKEY_LOCAL_MACHINE\Software\Microsoft\Windows\CurrentVersion\explorer\Shell Icons
   下,在右边的窗口中新建字符串值"43",并设其值为新图标的路径。

  更改"查找"的图标
   在HKEY_LOCAL_MACHINE\Software\Microsoft\Windows\CurrentVersion\explorer\Shell Icons
   下,在右边的窗口中新建字符串值"22",并设其值为新图标的路径。

  更改"开始"菜单中"程序"的图标
   在HKEY_LOCAL_MACHINE\Software\Microsoft\Windows\CurrentVersion\explorer\Shell Icons
   下,在右边的窗口中新建字符串值"19",并设其值为新图标的路径。

  更改pbl文件的图标
   在HKEY_CLASSES_ROOT下查找键值"pblfile",
   并在这个主键的\DefaultIcon,修改右边窗口中的“默认”值为新图标的路径.

  更改Internet Explorer的图标
   HKEY_LOCAL_MACHINE\Software\CLASSES\CLSID\{871C5380-42A0-1069-A2EA-08002B30309D}\DefaultIcon,
   在右边的窗口中修改字符串值“(默认)”为新图标的路径,如:“C:\w.ico,0”。

  更改"打开的文件夹"的图标
   在HKEY_LOCAL_MACHINE\Software\Microsoft\Windows\CurrentVersion\explorer\Shell Icons
   下,在右边的窗口中新建字符串值"4",并设其值为新图标的路径。

  更改3寸软盘的图标
   在HKEY_LOCAL_MACHINE\Software\Microsoft\Windows\CurrentVersion\explorer\Shell Icons
   下,在右边的窗口中新建字符串值"6",并设其值为新图标的路径。

  更改IE的图标
   在HKEY_LOCAL_MACHINE\Software\CLASSES\CLSID\{871C5380-42A0-1069-A2EA-08002B30309D}\DefaultIcon
   下,在右边的窗口中修改字符串值“(默认)”为新图标的路径。

  更改"我的公文包"的图标
   在HKEY_LOCAL_MACHINE\Software\CLASSES\CLSID\{85BBD920-42A0-1069-A2E4-08002B30309D}\DefaultIcon
   下,在右边的窗口中修改字符串值“(默认)”为新图标的路径。

  更改“计划任务”的图标
   在HKEY_LOCAL_MACHINE\Software\CLASSES\CLSID\{D6277990-4C6A-11CF-8D87-00AA0060F5BF}\DefaultIcon
   下,在右边的窗口中修改字符串值“(默认)”为新图标的路径。

  更改“收件箱”的图标
   在HKEY_LOCAL_MACHINE\Software\CLASSES\CLSID\{00020D75-0000-0000-C000-000000000046}\DefaultIcon
   下,在右边的窗口中修改字符串值“(默认)”为新图标的路径。

  给“控制面板”改名、改图标
   在HKEY_LOCAL_MACHINE\Software\CLASSES\CLSID\{21EC2020-3AEA-1069-A2DD-08002B30309D}下
   在右边的窗口中修改字符串值“(默认)”为新的名称
    改图标:在HKEY_LOCAL_MACHINE\Software\CLASSES\CLSID\{21EC2020-3AEA-1069- A2DD-08002B30309D}\DefaultIcon下,在右边的窗口中修改字符串值“(默认)”为新图标的路径。

  更改“打印机”图标
   在HKEY_LOCAL_MACHINE\Software\CLASSES\CLSID\{2227A280-3AEA-1069-A2DE-08002B30309D}\DefaultIcon
   下,在右边的窗口中修改字符串值“(默认)”为新图标的路径。

  给“回收站”改名、改图标
   HKEY_CLASSES_ROOT\CLSID\{645FF040-5081-101B-9F08-00AA002F954E}
   在右边的窗口中找到字符串值:“默认”,把“回收站”改为其它名称。
   HKEY_CLASSES_ROOT\CLSID\{645FF040-5081-101B-9F08-00AA002F954E}\DefaultIcon
   在右边的窗口中修改图标的路径。

  给“我的电脑”改名、改图标
   HKEY_CLASSES_ROOT\CLSID\{20D04FE0-3AEA-1069-A2D8-08002B30309D}
   在右边的窗口中找到字符串值:“默认”,把“我的电脑”改为其它名称。
   HKEY_CLASSES_ROOT\CLSID\{20D04FE0-3AEA-1069-A2D8-08002B30309D}\DefaultIcon
   在右边的窗口中修改图标的路径。

  给“我的文档”改名、改图标
   在右边的窗口中找到字符串值:“默认”,把“我的文档”改为其它名称。
   HKEY_CLASSES_ROOT\CLSID\{450D8FBA-AD25-11D0-98A8-0800361B1103}\DefaultIcon
   在右边的窗口中修改图标的路径
  预防Acid Battery v1.0木马的破坏
   在HKEY_LOCAL_MACHINE\Software\Microsoft\Windows\CurrentVersion\RunServices下
   若在右边窗口中如发现了“Explorer”键值,则说明中了YAI木马,将它删除。

  预防YAI木马的破坏
   在HKEY_LOCAL_MACHINE\Software\Microsoft\Windows\CurrentVersion\RunServices下
   若在右边窗口中如发现了“Batterieanzeige”键值,则说明中了YAI木马,将它删除。

  预防Eclipse 2000木马的破坏
   在HKEY_LOCAL_MACHINE\Software\Microsoft\Windows\CurrentVersion\RunServices下
   若在右边窗口中如发现了“bybt”键值,则将它删除。
   然后在HKEY_LOCAL_MACHINE\Software\Microsoft\Windows\CurrentVersion\RunServices下
   删除右边的键值“cksys”,重新启动电脑。

  预防BO2000的破坏
   在HKEY_LOCAL_MACHINE\Software\Microsoft\Windows\CurrentVersion\RunServices下
   若在右边窗口中如发现了“umgr32.exe”键值,则说明中了BO2000,将它删除。

  预防爱虫的破坏
   在HKEY_LOCAL_MACHINE\Software\Microsoft\Windows\CurrentVersion\Run下
   若在右边窗口中如发现了“MSKernel32”键值,就将它删除。

  禁止出现IE菜单中“工具”栏里“interner选项”
   把c:\windows\system下的名为inetcpl.cpl更名为inetcpl.old或则别的名字后就会出现禁止使用的情况
   把名字再换回来,就可以恢复使用。
How To Change the Windows XP Product Key Code

http://pcsupport.about.com/od/productkeysactivation/ht/changexpkey.htm

Here's How:

  1. Click on Start and then Run.

  2. In the text box in the Run window, type regedit and click OK. This will open the Registry Editor program.

  3. Locate the HKEY_LOCAL_MACHINE folder under My Computer and click on the (+) sign next the folder name to expand the folder.

  4. Continue to expand folders until you reach the HKEY_LOCAL_MACHINE\Software\Microsoft\WindowsNT\Current Version\WPAEvents registry key.

  5. Click on the WPAEvents folder.

  6. In the results that appear in the window on the right, locate OOBETimer.

  7. Right-click on the OOBETimer entry and choose Modify from the resulting menu.

  8. Change at least one digit in the Value data text box and click OK. This will deactivate Windows XP.

  9. Click on Start and then Run.

  10. In the text box in the Run window, type the following command and click OK.

    %systemroot%\system32\oobe\msoobe.exe /a

  11. When the Windows Product Activation window appears, choose Yes, I want to telephone a customer service representative to activate Windows and then click Next.

  12. Click Change Product Key.

  13. Type your new, valid Windows XP product key in the New key text boxes and then click Update.

  14. If you're taken back to the previous screen and prompted, choose Remind me later.

  15. Restart your PC.

电脑F1——F12键的功能

F1: 如果你处在一个选定的程序中而需要帮助,那么请按下F1。如果现在不是处在任何程序中,而是处在资源管理器或桌面,那么按下F1就会出现Windows的 帮助程序。如果你正在对某个程序进行操作,而想得到Windows帮助,则需要按下Win+F1。按下Shift+F1,会出现"What's This?"的帮助信息。
    
F2:如果在资源管理器中选定了一个文件或文件夹,按下F2则会对这个选定的文件或文件夹重命名。
    
F3: 在资源管理器或桌面上按下F3,则会出现“搜索文件”的窗口,因此如果想对某个文件夹中的文件进行搜索,那么直接按下F3键就能快速打开搜索窗口,并且搜 索范围已经默认设置为该文件夹。同样,在Windows Media Player中按下它,会出现“通过搜索计算机添加到媒体库”的窗口。
    
F4:这个键用来打开IE中的地址栏列表,要关闭IE窗口,可以用Alt+F4组合键。
    
F5:用来刷新IE或资源管理器中当前所在窗口的内容。
    
F6:可以快速在资源管理器及IE中定位到地址栏。
    
F7:在Windows中没有任何作用。不过在DOS窗口中,它是有作用的,试试看吧!
    
F8: 在启动电脑时,可以用它来显示启动菜单。有些电脑还可以在电脑启动最初按下这个键来快速调出启动设置菜单,从中可以快速选择是软盘启动,还是光盘启动,或 者直接用硬盘启动,不必费事进入BIOS进行启动顺序的修改。另外,还可以在安装Windows时接受微软的安装协议。
    
F9:在Windows中同样没有任何作用。但在Windows Media Player中可以用来快速降低音量。
    
F10:用来激活Windows或程序中的菜单,按下Shift+F10会出现右键快捷菜单。和键盘中Application键的作用是相同的。而在Windows Media Player中,它的功能是提高音量。
    
F11:可以使当前的资源管理器或IE变为全屏显示。
    
F12:在Windows中同样没有任何作用。但在Word中,按下它会快速弹出另存为文件的窗口。

XP keyboard HOT Keys


------------------------------------------------------------------------------------------

Shift + F10 = Right Click
------------------------------------------------------------------------------------------
将光盘插入到 CD-ROM 驱动器时按 SHIFT 键 阻止光盘自动播放。
------------------------------------------------------------------------------------------
At My Computer press F4.


------------------------------------------------------------------------------------------
WIN+ BREAK 显示"系统属性"对话框。


------------------------------------------------------------------------------------------
Ctrl + Esc 显示“开始”菜单。

How LAN Switches Work

How LAN Switches Work


http://www.verizon.com/learningcenter

A typical network consists of nodes (computers), a connecting medium (wired or wireless) and specialized network equipment like routers or hubs. In the case of the Internet, all of these pieces work together to allow your computer to send information to another computer that could be on the other side of the world!

Switches are a fundamental part of most networks. They make it possible for several users to send information over a network at the same time without slowing each other down. Just like routers allow different networks to communicate with each other, switches allow different nodes (a network connection point, typically a computer) of a network to communicate directly with one another in a smooth and efficient manner.

There are a lot of different types of switches and networks. Switches that provide a separate connection for each node in a company's internal network are called LAN switches. Essentially, a LAN switch creates a series of instant networks that contain only the two devices communicating with each other at that particular moment. Here we will focus on Ethernet networks that use LAN switches. You will learn what a LAN switch is and how transparent bridging works. You will also learn about VLANs, trunking and spanning trees.

Networking Basics
Here are some of the fundamental parts of a network:

Network Elements
In the picture above, you see several of the common elements of a network.

  • Network - A group of computers connected together in a way that allows information to be exchanged between the computers.
  • Node - Anything that is connected to the network. While a node is typically a computer, it can also be something like a printer or CD-ROM tower.
  • Segment - Any portion of a network that is separated, by a switch, bridge or router, from other parts of the network.
  • Backbone - The main cabling of a network that all of the segments connect to. Typically, the backbone is capable of carrying more information than the individual segments. For example, each segment may have a transfer rate of 10 Mbps (megabits per second: 1 million bits a second), while the backbone may operate at 100 Mbps.
  • Topology - The way that each node is physically connected to the network. Common topologies include:

    • Bus - Each node is daisy-chained (connected one right after the other) along the same backbone, similar to Christmas lights. Information sent from a node travels along the backbone until it reaches its destination node. Each end of a bus network must be terminated with a resistor to keep the signal that is sent by a node across the network from bouncing back when it reaches the end of the cable.

    Bus Network
    Bus network topology

    • Ring - Like a bus network, rings have the nodes daisy-chained. The difference is that the end of the network comes back around to the first node, creating a complete circuit. In a ring network, each node takes a turn sending and receiving information through the use of a token. The token, along with any data, is sent from the first node to the second node, which extracts the data addressed to it and adds any data it wishes to send. Then, the second node passes the token and data to the third node, and so forth until it comes back around to the first node again. Only the node with the token is allowed to send data. All other nodes must wait for the token to come to them.

    Ring Network
    Ring network topology

    • Star - In a star network, each node is connected to a central device called a hub. The hub takes a signal that comes from any node and passes it along to all the other nodes in the network. A hub does not perform any type of filtering or routing of the data. It is simply a junction that joins all the different nodes together.

    Star Network
    Star network topology

    • Star Bus - Probably the most common network topology in use today, star bus combines elements of the star and bus topologies to create a versatile network environment. Nodes in particular areas are connected to hubs (creating stars), and the hubs are connected together along the network backbone (like a bus network). Quite often, stars are nested within stars, as seen in the example below:

    Star Bus Network
    A typical star bus network.
  • Local Area Network (LAN) - A network of computers that are in the same general physical location, usually within a building or a campus. If the computers are far apart (such as across town or in different cities), then a Wide Area Network (WAN) is typically used.
  • Network Interface Card (NIC) - Every computer (and most other devices) is connected to a network through an NIC. In most desktop computers, this is an Ethernet card (normally 10 or 100 Mbps) that is plugged into a slot on the computer's motherboard.
  • Media Access Control (MAC) Address - This is the physical address of any device, such as the NIC in a computer, on the network. The MAC address has two parts, each 3 bytes long. The first 3 bytes identify the company that made the NIC. The second 3 bytes are the serial number of the NIC itself.
  • Unicast - A transmission from one node addressed specifically to another node.
  • Multicast - When a node sends a packet addressed to a special group address. Devices that are interested in this group register to receive packets addressed to the group.
  • Broadcast - When a node sends out a packet that is intended for transmission to all other nodes on the network.
  • Adding Switches
    In the most basic type of network found today, nodes are simply connected together using hubs. As a network grows, there are some potential problems with this configuration:

  • Scalability: In a hub network, limited shared bandwidth makes it difficult to accommodate significant growth without sacrificing performance. Applications today need more bandwidth than ever before. Quite often, the entire network must be redesigned periodically to accommodate growth.
  • Latency: The amount of time that it takes a packet to get to its destination. Since each node in a hub-based network has to wait for an opportunity to transmit in order to avoid collisions, the latency can increase significantly as you add more nodes. Or, if someone is transmitting a large file across the network, then all of the other nodes have to wait for an opportunity to send their own packets. You have probably seen this before at work -- you try to access a server or the Internet and suddenly everything slows down to a crawl.
  • Network Failure: In a typical network, one device on a hub can cause problems for other devices attached to the hub due to wrong speed settings (100 Mbps on a 10 Mbps hub) or excessive broadcasts. Switches can be configured to limit broadcast levels.
  • Collisions: Ethernet uses a process called Carrier Sense Multiple Access with Collision Detection (CSMA/CD) to communicate across the network. Under CSMA/CD, a node will not send out a packet unless the network is clear of traffic. If two nodes send out packets at the same time, a collision occurs and the packets are lost. Then both nodes wait a random amount of time and retransmit the packets. Any part of the network where there is a possibility that packets from two or more nodes will interfere with each other is considered to be part of the same collision domain. A network with a large number of nodes on the same segment will often have a lot of collisions and therefore a large collision domain.
  • While hubs provide an easy way to scale up and shorten the distance that the packets must travel to get from one node to another, they do not break up the actual network into discrete segments. That is where switches come in.

    Switch Example
    Imagine that each vehicle is a packet of data waiting for an opportunity to continue on its trip.

    Think of a hub as a four-way intersection where everyone has to stop. If more than one car reaches the intersection at the same time, they have to wait for their turn to proceed. Now imagine what this would be like with a dozen or even a hundred roads intersecting at a single point. The amount of waiting and the potential for a collision increases significantly. But wouldn't it be amazing if you could take an exit ramp from any one of those roads to the road of your choosing? That is exactly what a switch does for network traffic! A switch is like a cloverleaf intersection -- each car can take an exit ramp to get to its destination without having to stop and wait for other traffic to go by.

    A vital difference between a hub and a switch is that all the nodes connected to a hub share the bandwidth among themselves, while a device connected to a switch port has the full bandwidth all to itself. For example, if 10 nodes are communicating using a hub on a 10 Mbps network, then each node may only get a portion of the 10 Mbps if other nodes on the hub want to communicate as well. But with a switch, each node could possibly communicate at the full 10 Mbps. Think about our road analogy. If all of the traffic is coming to a common intersection, then it has to share that intersection with everyone else. But a cloverleaf allows all of the traffic to continue at full speed from one road to the next.

    In a fully switched network, switches replace all the hubs of an Ethernet network with a dedicated segment for every node. These segments connect to a switch, which supports multiple dedicated segments (sometimes in the hundreds). Since the only devices on each segment are the switch and the node, the switch picks up every transmission before it reaches another node. The switch then forwards the frame over the appropriate segment. Since any segment contains only a single node, the frame only reaches the intended recipient. This allows many conversations to occur simultaneously on a switched network.

    Switching allows a network to maintain full-duplex Ethernet. Before switching, Ethernet was half-duplex, which means that only one device on the network can transmit at any given time. In a fully switched network, nodes only communicate with the switch, never directly with each other. Using our road analogy, half-duplex is similar to the problem of a single lane, like when road construction closes down the use of one lane of a two-lane road. Traffic is trying to use the same lane in both directions. This means that traffic coming one way must wait until traffic from the other direction stops -- otherwise, they will hit head-on!

    Fully switched networks employ either twisted-pair or fiber-optic cabling, both of which use separate conductors for sending and receiving data. In this type of environment, Ethernet nodes can forgo the collision detection process and transmit at will, since they are the only potential devices that can access the medium. In other words, traffic flowing in each direction has a lane to itself. This allows nodes to transmit to the switch as the switch transmits to them, in a collision free environment. Transmitting in both directions also can effectively double the apparent speed of the network when two nodes are exchanging information. For example, if the speed of the network is 10Mbps, then each node can transmit simultaneously at 10 Mbps.

    Mixed Network-2 Switches/3 Hubs
    A mixed network with two switches and three hubs.

    Most networks are not fully switched because of the costs incurred in replacing all of the hubs with switches. Instead, a combination of switches and hubs are used to create an efficient yet cost-effective network. For example, a company may have hubs connecting the computers in each department and a switch connecting all of the department-level hubs.

    Switching Technologies
    You can see that a switch has the potential to radically change the way nodes communicate with each other. But you may be wondering what makes it different from a router. Switches usually work at Layer 2 (Data or Datalink) of the OSI Reference Model, using MAC addresses, while routers work at Layer 3 (Network) with Layer 3 addresses (IP, IPX or Appletalk depending on what Layer 3 protocols are being used). The algorithm that switches use to decide how to forward packets is different from the algorithms used by routers to forward packets. One of these differences in the algorithms between switches and routers is how broadcasts are handled. On any network, the concept of a broadcast packet is vital to the operability of a network. Whenever a device needs to send out information but doesn't know who it should send it to, it sends out a broadcast. For example, every time a new computer or other device comes on to the network, it sends out a broadcast packet to announce its presence. The other nodes (such as a domain server) can add the computer to their browser list (kind of like an address directory) and communicate directly with that computer from that point on. Broadcasts are used any time a device needs to make an announcement to the rest of the network or is unsure of who the recipient of the information should be.

    OSI Reference Model
    The OSI Reference Model consists of seven layers that build from the wire (Physical) to the software (Application).

    A hub or a switch will pass along any broadcast packets they receive to all the other segments in the broadcast domain; but a router will not. Think about our four-way intersection again: All of the traffic passed through the intersection no matter where it was going. Now imagine that this intersection is at an international border. To pass through the intersection, you must provide the border guard with the specific address that you are going to. If you don't have a specific destination, then the guard will not let you pass. A router works like this. Without the specific address of another device, it will not let the data packet through. This is a good thing for keeping networks separate from each other, but not so good when you want to talk between different parts of the same network. This is where switches come in.

    LAN switches rely on Packet-switching. The switch establishes a connection between two segments just long enough to send the current packet. Incoming packets (part of an Ethernet frame) are saved to a temporary memory area (buffer); the MAC address contained in the frame's header is read and then compared to a list of addresses maintained in the switch's lookup table. In an Ethernet-based LAN, an Ethernet frame contains a normal packet as the payload of the frame, with a special header that includes the MAC address information for the source and destination of the packet.

    Packet-based switches use one of three methods for routing traffic:

  • Cut-through
  • Store and forward
  • Fragment-free

    Cut-through switches read the MAC address as soon as a packet is detected by the switch. After storing the six bytes that make up the address information, they immediately begin sending the packet to the destination node, even as the rest of the packet is coming into the switch.

    A switch using store and forward will save the entire packet to the buffer and check it for CRC errors or other problems before sending. If the packet has an error, it is discarded. Otherwise, the switch looks up the MAC address and sends the packet on to the destination node. Many switches combine the two methods, using cut-through until a certain error level is reached and then changing over to store and forward. Very few switches are strictly cut-through, since this provides no error correction.

    A less common method is fragment-free. It works like cut-through except that it stores the first 64 bytes of the packet before sending it on. The reason for this is that most errors, and all collisions, occur during the initial 64 bytes of a packet.

    LAN switches vary in their physical design. Currently, there are three popular configurations in use:

  • Shared-memory - Stores all incoming packets in a common memory-buffer shared by all the switch ports (input/output connections), then sends them out via the correct port for the destination node.
  • Matrix - This type of switch has an internal grid with the input ports and the output ports crossing each other. When a packet is detected on an input port, the MAC address is compared to the lookup table to find the appropriate output port. The switch then makes a connection on the grid where these two ports intersect.
  • Bus-architecture - Instead of a grid, an internal transmission path (common bus) is shared by all of the ports using TDMA. A switch based on this configuration has a dedicated memory-buffer for each port, as well as an ASIC to control the internal bus access.
  • Transparent Bridging
    Most Ethernet LAN switches use a very cool system called transparent bridging to create their address lookup tables. Transparent bridging is a technology that allows a switch to learn everything it needs to know about the location of nodes on the network without the network administrator having to do anything. Transparent bridging has five parts:

  • Learning
  • Flooding
  • Filtering
  • Forwarding
  • Aging
  • Here's how it works:


    Click on the menu terms to learn more about how transparent bridging works.
  • The switch is added to the network and the various segments are plugged into the switch's ports.
  • A computer (Node A) on the first segment (Segment A) sends data to a computer (Node B) on another segment (Segment C).
  • The switch gets the first packet of data from Node A. It reads the MAC address and saves it to the lookup table for Segment A. The switch now knows where to find Node A anytime a packet is addressed to it. This process is called learning.
  • Since the switch does not know where Node B is, it sends the packet to all of the segments except the one that it arrived on (Segment A). When a switch sends a packet out to all segments to find a specific node, it is called flooding.
  • Node B gets the packet and sends a packet back to Node A in acknowledgement.
  • The packet from Node B arrives at the switch. Now the switch can add the MAC address of Node B to the lookup table for Segment C. Since the switch already knows the address of Node A, it sends the packet directly to it. Because Node A is on a different segment than Node B, the switch must connect the two segments to send the packet. This is known as forwarding.
  • The next packet from Node A to Node B arrives at the switch. The switch now has the address of Node B, too, so it forwards the packet directly to Node B.
  • Node C sends information to the switch for Node A. The switch looks at the MAC address for Node C and adds it to the lookup table for Segment A. The switch already has the address for Node A and determines that both nodes are on the same segment; so it does not need to connect Segment A to another segment for the data to travel from Node C to Node A. Therefore, the switch will ignore packets traveling between nodes on the same segment. This is filtering.
  • Learning and flooding continues as the switch adds nodes to the lookup tables. Most switches have plenty of memory in a switch for maintaining the lookup tables; but to optimize the use of this memory, they still remove older information so that the switch doesn't waste time searching through stale addresses. To do this, switches use a technique called aging. Basically, when an entry is added to the lookup table for a node, it is given a timestamp. Each time a packet is received from a node, the timestamp is updated. The switch has a user-configurable timer that erases the entry after a certain length of time with no activity from that node. This frees up valuable memory resources for other entries. As you can see, transparent bridging is a great and essentially maintenance-free way to add and manage all the information a switch needs to do its job!

    In our example, two nodes share each segment. In an ideal LAN-switched network, every node would have its own segment. This would eliminate the possibility of collisions and also the need for filtering. Notice that while a node on Segment A is talking to a node on Segment B at 10 Mbps, a node on Segment C can communicate with a node on Segment D at 10 Mbps also.

    Redundancy and Broadcast Storms
    When we talked about bus and ring networks earlier, one issue was the possibility of a single point of failure. In a star or starbus network, the point with the most potential for bringing all or part of the network down is the switch or hub. Look at the example below:

    Network without Redundancy

    In this example, if either switch A or C fails, then the nodes connected to that particular switch are affected, but nodes at the other two switches can still communicate. However, if switch B fails, then the entire network is brought down. What if we add another segment to our network connecting switches A and C?

    Network with Redundancy

    In this case, even if one of the switches fails, the network will continue. This provides redundancy, effectively eliminating the single point of failure.

    But now we have a new problem. In the last section, you discovered how switches learn where the nodes are located. With all of the switches now connected in a loop, a packet from a node could quite possibly come to a switch from two different segments. For example, imagine that Node B is connected to Switch A, and needs to communicate with Node A on Segment B. Switch A does not know who Node A is, so it floods the packet.

    Redundant Switches with Nodes

    The packet travels via Segment A or Segment C to the other two switches (B and C). Switch B will add Node B to the lookup table it maintains for Segment A, while Switch C will add it to the lookup table for Segment C. If neither switch has learned the address for Node A yet, they will flood Segment B looking for Node A. Each switch will take the packet sent by the other switch and flood it back out again immediately, since they still don't know who Node A is. Switch A will receive the packet from each segment and flood it back out on the other segment. This causes a broadcast storm as the packets are broadcast, received and rebroadcast by each switch, resulting in potentially severe network congestion.

    Which brings us to spanning trees...

    Spanning Trees
    To prevent broadcast storms and other unwanted side effects of looping, Digital Equipment Corporation created the Spanning Tree Protocol (STP), which has been standardized as the 802.1d specification by the Institute of Electrical and Electronic Engineers (IEEE). Essentially, a spanning tree uses the spanning tree algorithm (STA), which senses that the switch has more than one way to communicate with a node, determines which way is best and blocks out the other path(s). The cool thing is that it keeps track of the other path(s), just in case the primary path is unavailable.

    Here's how STP works:

  • Each switch is assigned a group of IDs, one for the switch itself and one for each port on the switch. The switch's identifier, called the Bridge ID (BID), is 8 bytes long and contains a bridge priority (2 bytes) along with one of the switch's MAC addresses (6 bytes). Each Port ID is 16 bits long with two parts: a 6 bit priority setting and a 10 bit port number.
  • A path cost value is given to each port. The cost is typically based on a guideline established as part of 802.1d. According to the original specification, cost is 1000 Mbps (1 gigabit per second) divided by the bandwidth of the segment connected to the port. Therefore, a 10 Mbps connection would have a cost of 100 (1000 divided by 10).
  • To compensate for the speed of networks increasing beyond the gigabit range, the standard cost has been slightly modified. The new cost values are:

    Bandwidth STP Cost Value
    4 Mbps 250
    10 Mbps 100
    16 Mbps 62
    45 Mbps 39
    100 Mbps 19
    155 Mbps 14
    622 Mbps6
    1 Gbps4
    10 Gbps2

    You should also note that the Path Cost can be an arbitrary value assigned by the network administrator, instead of one the standard cost values.

  • Each switch begins a discovery process to choose which network paths it should use for each segment. This information is shared between all the switches by way of special network frames, called bridge protocol data units (BPDU). The parts of a BPDU are:
    • Root BID - This is the BID of the current Root Bridge.
    • Path Cost to Root Bridge - Determines how far away the Root Bridge is. For example, if the data has to travel over three 100 Mbps segments to reach the Root Bridge, then the cost is 38 (19 + 19 + 0). The segment attached to the Root Bridge will normally have a Path Cost of zero.
    • Sender BID - The BID of the switch that sends the BPDU.
    • Port ID - The actual port on the switch that this BPDU was sent from.

    All of the switches are constantly sending BPDUs to each other, trying to determine the best path between various segments. When a switch receives a BPDU (from another switch) that is better than the one it is broadcasting for the same segment, it will stop broadcasting its BPDU out that segment. It will, instead, store the other switch's BPDU for reference and for broadcasting out to inferior segments, such as those that are farther away from the root bridge.

  • A Root Bridge is chosen based on the results of the BPDU process between the switches. Initially, every switch considers itself the Root Bridge! When a switch first powers up on the network, it sends out a BPDU with its own BID as the Root BID. When the other switches receive the BPDU, they compare the BID to the one they already have stored as the Root BID. If the new Root BID has a lower value, they replace the saved one. But if the saved Root BID is lower, a BPDU is sent to the new switch with this BID as the Root BID. When the new switch receives the BPDU, it realizes that it is not the Root Bridge and replaces the Root BID in its table with the one it just received. The result is that the switch that has the lowest BID is elected by the other switches as the Root Bridge.

  • Based on the location of the Root Bridge, the other switches determine which of their ports has the lowest path cost to the Root Bridge. These ports are called Root Ports, and each switch (other than the current Root Bridge) must have one.

  • The switches determine who will have Designated Ports. A Designated Port is the connection used to send and receive packets on a specific segment. By having only one Designated Port per segment, all looping issues are resolved!

    Designated Ports are selected based on the lowest path cost to the Root Bridge for a segment. Since the Root Bridge will have a path cost of "0," any ports on it that are connected to segments will become Designated Ports. For the other switches, the path cost is compared for a given segment. If one port is determined to have a lower path cost, it becomes the Designated Port for that segment. If two or more ports have the same path cost, then the switch with the lowest BID is chosen.

  • Once the Designated Port for a network segment has been chosen, any other ports that connect to that segment become non-Designated Ports. They block network traffic from taking that path so that it can only access that segment through the Designated Port.
  • Each switch has a table of BPDUs that it continually updates. The network is now configured as a single spanning tree, with the Root Bridge as the trunk and all the other switches as branches. Each switch communicates with the Root Bridge through the Root Ports, and with each segment through the Designated Ports, thereby maintaining a loop-free network. In the event that the Root Bridge begins to fail or have network problems, STP allows the other switches to immediately reconfigure the network with another switch acting as Root Bridge. This amazing process gives a company the ability to have a complex network that is fault-tolerant and yet fairly easy to maintain.

    Routers and Layer 3 Switching
    While most switches operate at the Data layer (Layer 2) of the OSI Reference Model, some incorporate features of a router, and operate at the Network layer (Layer 3) as well. In fact, a Layer 3 switch is incredibly similar to a router.

    Layer 3 Switch Diagram
    Like routers, Layer 3 switches actually work at the Network layer.

    When a router receives a packet, it looks at the Layer 3 (Network Layer) source and destination addresses to determine the path the packet should take. A standard switch relies on the MAC addresses to determine the source and destination of a packet, which is Layer 2 (Data) networking.

    The fundamental difference between a router and a Layer 3 switch is that Layer 3 switches have optimized hardware to pass data as fast as Layer 2 switches, yet they make decisions on how to transmit traffic at Layer 3, just like a router. Within the LAN environment, a Layer 3 switch is usually faster than a router because it is built on switching hardware. In fact, many Layer 3 switches are actually routers that operate faster because they are built on "switching" hardware with customized chips inside the box.

    The pattern matching and caching on Layer 3 switches is similar to the pattern matching and caching on a router. Both use a routing protocol and routing table to determine the best path. However, a Layer 3 switch has the ability to reprogram the hardware dynamically with the current Layer 3 routing information. This is what allows much faster packet processing.

    On current Layer 3 switches, the information received from the routing protocols is used to update the hardware caching tables. The 6000 is a great way to connect to the Internet because it has WAN cards; but, based on traffic flow and budget, simple routers of varying sizes are usually fine for Internet connections. An important item to note: Routers are necessary when communicating between two VLANs...

    VLANs
    As networks have grown in size and complexity, many companies have turned to Virtual Local Area Networks (VLANs) to provide some way of structuring this growth logically. Basically, a VLAN is a collection of nodes that are grouped together in a single broadcast domain that is based on something other than physical location. You learned about broadcasts earlier, and how a router does not pass along broadcasts. A broadcast domain is a network (or portion of a network) that will receive a broadcast packet from any node located within that network. In a typical network, everything on the same side of the router is all part of the same broadcast domain. A switch that you have implemented VLANs on has multiple broadcast domains, similar to a router. But you still need a router to route from one VLAN to another; the switch can't do this by itself.

    Here are some common reasons why a company might have VLANs:

  • Security - Separating systems with sensitive data from the rest of the network decreases the chance that someone will gain access to information they are not authorized to see.
  • Projects/Special applications - Managing a project or working with a specialized application can be simplified by the use of a VLAN that brings all of the required nodes together.
  • Performance/Bandwidth - Careful monitoring of network use allows the network administrator to create VLANs that reduce the number of router hops and increase the apparent bandwidth for network users.
  • Broadcasts/Traffic flow - Since a principle element of a VLAN is the fact that it does not pass broadcast traffic to nodes that are not part of the VLAN, it automatically reduces broadcasts. Access lists provide the network administrator with a way to control who sees what network traffic. An access list is a table the network administrator creates that lists what addresses have access to that network.
  • Departments/Specific job types - Companies may want VLANs set up for departments that are heavy network users (such as Multimedia or Engineering), or a VLAN across departments that is dedicated to specific types of employees (such as managers or sales people).
  • You can create a VLAN using most switches simply by logging into the switch via Telnet and entering the parameters for the VLAN (name, domain and port assignments). After you have created the VLAN, any network segments connected to the assigned ports will become part of that VLAN.

    While you can have more than one VLAN on a switch, they cannot communicate directly with one another on that switch. If they could, it would defeat the purpose of having a VLAN, which is to isolate a part of the network. Communication between VLANs requires the use of a router.

    VLANs can span across multiple switches and you can have more than one VLAN on each switch. For multiple VLANs on multiple switches to be able to communicate via a single link between the switches, you must use a process called trunking; trunking is the technology that allows information from multiple VLANs to be carried over just one link between switches.

    The VLAN Trunking Protocol (VTP) is the protocol that switches use to communicate among themselves about VLAN configuration.

    VLAN Trunk Protocol

    In the image above, each switch has two VLANs. On the first switch, VLAN A and VLAN B are sent through a single port (trunked) to the router and through another port to the second switch. VLAN C and VLAN D are trunked from the second switch to the first switch, and through the first switch to the router. This trunk can carry traffic from all four VLANs. The trunk link from the first switch to the router can also carry all four VLANs. In fact, this one connection to the router allows the router to appear on all four VLANs, as if it had four, different, physical ports connected to the switch.

    The VLANs can communicate with each other via the trunking connection between the two switches using the router. For example, data from a computer on VLAN A that needs to get to a computer on VLAN B (or VLAN C or VLAN D) must travel from the switch to the router and back again to the switch. Because of the transparent bridging algorithm and trunking, both PCs and the router think that they are on the same physical segment!

    As you can see, LAN switches are an amazing technology that can really make a difference in the speed and quality of your network.

    AVG Internet Security 2013

    Total Pageviews

    Contributors