Search in uioop.blogspot.com

Blog Archive

Thursday, August 19, 2010

Fresh Snow Leopard 10.6.4 Installation on VMware Player 3 – Intel, AMD PC

Article from http://www.sysprobs.com/fresh-snow-leopard-1064-installation-vmware-player-3-intel-amd-pc

Required Products for Fresh Snow Leopard Installation on VMware Player 3

1) VMware Player or Workstation ( This post goes with VMPlayer)

2) Mac OS X Snow Leopard DVD or ISO ( Convert the original DVD to ISO as shown in this post, you may get some reading EBIOS errors if use DVD)

3) Download pre configured Mac VMX files and others.

4) Time to spend with post installation configurations.

Demonstration PC Configuration.

I’m using a PC with following configuration.

Intel Core2duo 2.66 GHz, 3GB RAM, Intel P35 chipset, Windows 7 32 Bit OS, Processor and motherboard support Virtualization Technology ( VT) and 64 Bit architecture.

Lets Start.

1) Make sure VT is turned on in physical computer motherboard and host OS is detecting it. Read more here.

2) Extract the download Snowy_VM to a place with 15GB free Space. (These files are having pre configured Mac VM configuration, hard disk, boot loader and post installation packages.)

3) Start VMware Player and Click on ‘Open a Virtual Machine’. Browse for following VMX file in extracted location.
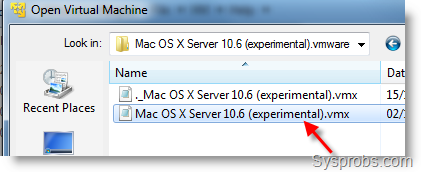
Snow Leopard 10.6.4 Installation on VMware Player 3

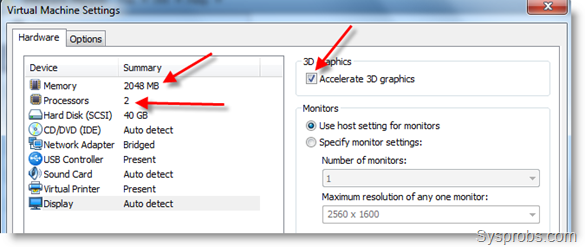
4) Virtual machine’s default pre settings are fair enough, but if more resources available on host computer then go to virtual machine settings and change.

I configured,

2 Processor Cores,

2GB Ram

Enabled ‘Accelerate 3D graphics’ (Hope for better performance)
Snow Leopard 10.6.4 Installation on VMware Player 3

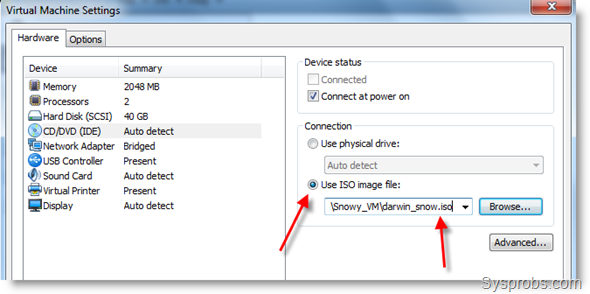
5) Click on CD/DVD option and mount Darwin_snow.iso file as shown below.
Snow Leopard 10.6.4 Installation on VMware Player 3

6) Start virtual machine and keep Mac SL installation ISO file ready.

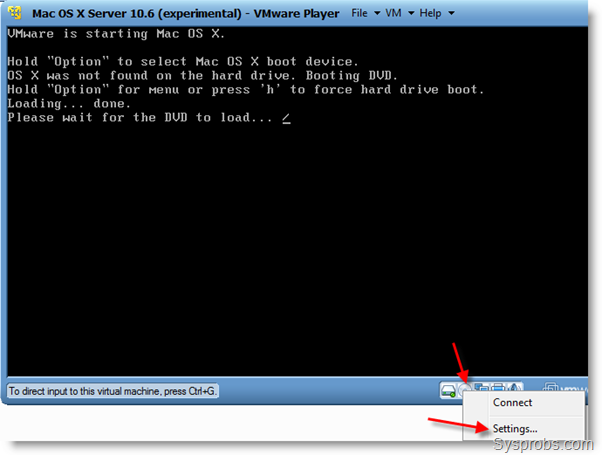
7) When following screen appears, load installation ISO file.
load_dvd

To do it, right click on CD icon and select settings. Browse for correct ISO file and make sure to click ‘Connected’ under Device status. Once it’s loaded successfully installation will start after few seconds or by pressing any keyboard keys.

8.) Continue the installation, select disk and customize to remove languages and printer support to save time and space if you want.
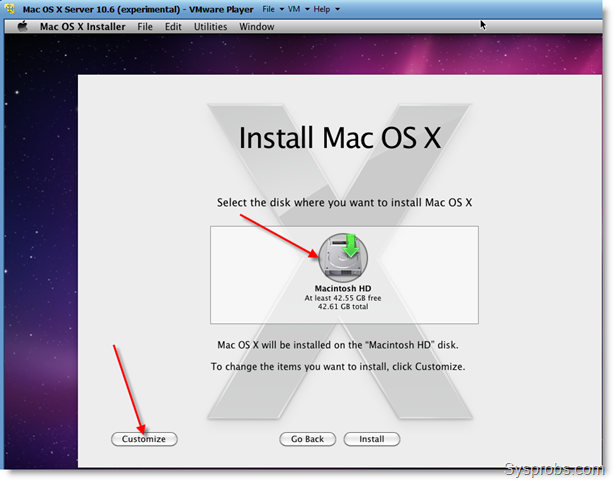
disk_selection

9) Oops, did you get following error screen at the end of installation? Don’t worry, I got too.
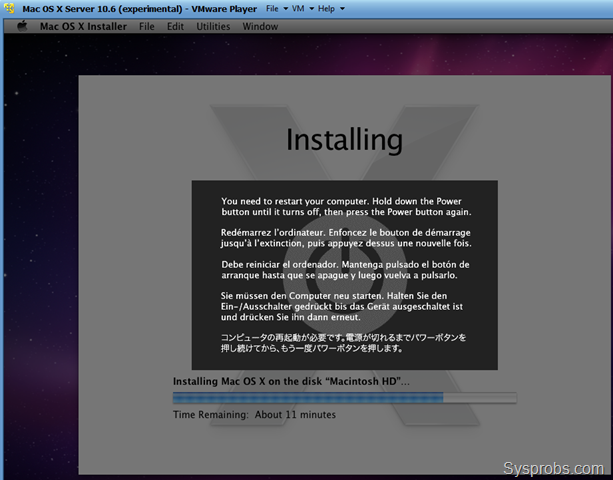
error_installation

Go to VM menu and Power off Virtual machine (Don’t restart).

Darwin_snow.iso should be loaded again to CD ROM to boot Mac OS X from installed hard disk. After loading ISO file, power on the SL VM.

10) Again, I stuck here. I waited for few minutes and reset machine several times but nothing brought the proper screen except Apple loading screen. If you are facing similar problem then go to end of this article called ‘ Issues faced and How I Fixed’.

That’s it installation done. Now you have working Snow leopard 10.6 in normal Intel computer with VMware Player.

Post Configurations and setups of Fresh Snow Leopard Installation on VMware Player 3

1) Network and Internet
Worked out of the box in all three Network connection types.

2) VMware Tools and Screen Resolution Size for Snow Leopard on VMplayer.
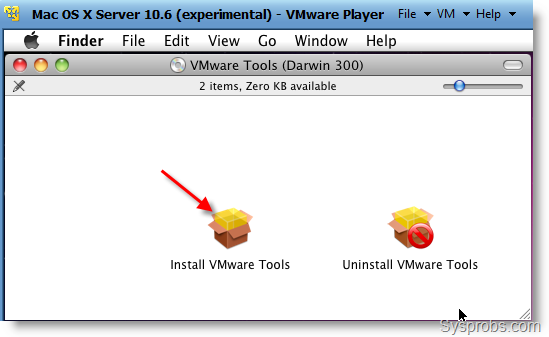
Install_VMware_Tools

Mount the Darwin ISO while SL is running and start ‘Install VMware Tools’ package from CD ROM. These tools will install VMware virtual display adapter driver for Mac and Shared folders feature.

screen_resolution

You can manually download VGA driver for Mac OS X guest and install as mentioned in earlier post here.

3) USB Support

Swapping USB devices between guest and host worked without any problems.

4) Sound

Sound driver package for Mac guest on VMware located in Snowy_VM folder, called ‘EnsoniqAudioPCI.mpkg.tar.gz’. Copy this file into VM, extract and start the installation (opening .mpkg file) as root.
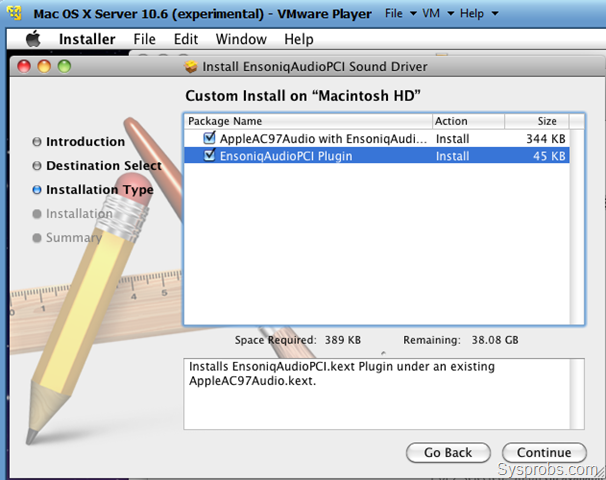
Snow Leopard 10.6.4 Installation on VMware Player 3

Restart VM, don’t worry about crashing errors. Try to boot several times. Speaker icon appears on Snow Leopard bar and sound works.
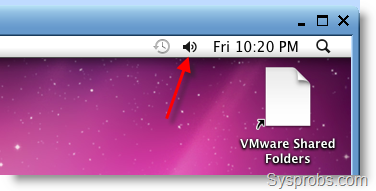
working_sound

5) VMware Shared Folders in Snow Leopard

After installed VMware tools mentioned in step 1, Shared folders between Host OS and Mac guest will start work. To activate this, go to settings of VM and select options.
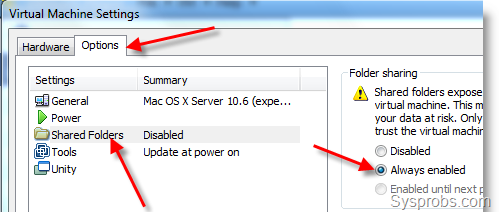
Snow Leopard 10.6.4 Installation on VMware Player 3

By default folder sharing is disabled, select ‘Always enabled’ and press Add button at bottom to point host computer folder or drive. Make it ‘Read only’ if you want more protection from guest OS. Once you applied, shared folder or drive of host computer (any Windows OS) can be accessed in Mac Snow leopard guest through VMware Shared folder shortcut on Desktop.

6) Update to 10.6.4 Snow Leopard

I did this manually, downloaded ‘10.6.4 combo update’ and installed. Update went successfully and restarted VM without any problems.
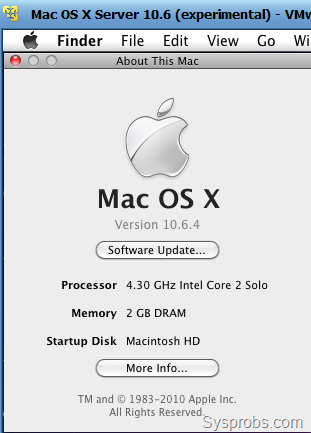
Snow Leopard 10.6.4 Installation on VMware Player 3

7) Boot loader to boot from hard disk

Darwin.iso or darin_snow.iso file must be loaded to CD drive every time to boot.

Issues Faced and How I Fixed.

If you face any booting Issues or stuck with loading arrows with Mac Logo for long time then shutdown the Virtual machine and close VMware. Open Mac OS X Server 10.6 (experimental).vmx in notepad, and;

Find out a line smc.present = “TRUE” and change it to smc.present = “FALSE”

Save the file and start VM now.

Still any booting issues?
AMD and Windows 7 64 Bit Host users download darwin_legacy boot loader from here.

Sometimes you have to reset and start Virtual machine more than five times to get normal desktop, so don’t give up.

Feel free to share your success stories and problems here. I will try my best to get a solution for you.

Have fun.

Wednesday, August 18, 2010

Sharing files between Windows Vista Home Edition PC and a Mac OS X Leopard 10.5

Article from http://tech.ifelix.net/3022.html

Sharing files between a Windows Vista Home Edition PC and a Mac running OS X Leopard 10.5

You can use the following procedure to share files between a Windows PC running Windows Vista Home Edition and a Mac running OS X Leopard 10.5.

Both computers may need to have their firewalls turned off if you are using a router you will have a hardware firewall, or you can have the relevant ports opened. These ports are 548, 427 and 139.

Stage 1 Ensure all computers are on the same subnet

Ensure that first each of the computers can access your network. Ensure that the IP address of each computer shares the same subnet, ie 10.0.1.x or 192.168.0.x or whatever! Also write down the IP address of both the Mac and the PC.

How do I find a Vista Home Edition PC's IP address?

How do I find a Mac running Leopard 10.5's IP address?

Stage 2 Usernames and Passwords

It really helps with the Windows PC to have a user account with a username and a password and to know the shortname and password associated with the Mac.

How do I find my Mac (OS X) shortname?

Creating a new user account on Windows Vista

If you want to make it very easy to share both home directories (all files) of both the Mac and the PC, it really helps if the usernames and passwords match on both the PC and the Mac.

If you don't require users to need a password to access the shared folder on the Vista PC then turn off password protected sharing.

Stage 3 Setting up Mac File Sharing

On the Mac

System Preferences -> Sharing

screenshot

Ensure that File Sharing is checked.

screenshot

At this basic level only the Mac user's Public Folder will be available. You can in Leopard specify specific folders and whether users can only read files or can write to the folder.

To add a folder click the + button under Shared Folders.

screenshot

Navigate to the folder you wish to share and click the Add button.

screenshot

At this level no user except a user using the Mac user's credentials will be able to access the folder.

screenshot

To change access rights use the up and down arrows to the right of the access rights.

screenshot

To add specific people, click the + button under Users to specify who can access this shared folder and whether they have read and write rights over the folder.

screenshot

This will bring up access to your Address Book.

screenshot

Click New Person

screenshot

Add the Windows username and password, click Create Account. The select the account in the Address Book pane and then click the Select button.

You now need to allow SMB access to the folder or folders you wish to share. Click the Options... button.

screenshot

This will bring up the options dialogue.

screenshot

Check the SMB check box.

screenshot

If you wish to share your entire user account you will need to check the On chekcbox for the account and enter that account's password.

In this example I am going to make my Downloads folder available on a read only basis to Everyone.

screenshot

Stage 4 Setting up PC File Sharing

On the Windows PC, Start -> Control Panel

screenshot

This will bring up the following window.

screenshot

Click on Set up file sharing.

screenshot

This will bring up the Network and Sharing Centre.

screenshot

This window should be showing you the network to which the computer is connected (in this example it is my local area network, and that this is a home and private network.

We are going to share a folder with a specific user, if we want to share files with everyone then it is advised to use and turn on Public folder sharing.

Another option is if you don't require users to need a password to access the shared folder then turn off password protected sharing.

As you can see File sharing is currently Off. Click the downward arrow on the right to change File sharing from Off to On.

screenshot

Check the Turn on file sharing radio button.

screenshot

Click the Apply button and file sharing is now turned on.

screenshot

Though you have now turned on file sharing, you now need to identify which folders you wish to share. Use Explorer to navigate to the folder containing the folder you wish to share.

screenshot

Select the folder you wish to share, a Share icon and menu item will appear.

screenshot

Click the Share menu item, you now be asked to identify who you wish to share the folder with. In this example I am sharing my Documents folder.

screenshot

Click the arrow on the drop down box and you will be given a list of users on the Windows Vista PC. In this example I have already created a Windows Vista PC user account which matches my Mac's shortname and password.

screenshot

I can now add ifelix to my list of people I wish to share this folder with, I can also set the permission level to allow ifelix just to read the folder or to have read write rights over the folder.

screenshot

Click the Share button, this brings up the following screen.

screenshot

The link indicated in the dialogue only applies to other Windows users and will not work on a Mac.

Stage 5 Sharing Files Mac to PC

On the Mac using Finder

Finder -> Go -> Connect to Server

screenshot

You will now see the Connect To Serve window.

screenshot

Now you can try entering the Vista PC's name, but generally you will have more success with using the PC's IP address.

How do I find a Vista Home Edition PC's IP address?

Type in smb://IP Address of PC

example smb://192.168.0.61

screenshot

Click the + button for Finder to remember this location.

Click Connect

It will then attempt to connect to the PC

screenshot

You will then be asked to authenticate. The Mac will put in your Mac shortname.

screenshot

Do not try and connect as a Guest as this only works with other Macs.

You need to use the Windows username and password you created earlier (or the PC's account), NOT your Mac shortname and password.

screenshot

Check the Remember this password in my keychain box to avoid having to enter the password again.

screenshot

If it is successful you will see the following and will ask you to Select the SMB/CIFS shared volume you want to connect to. Select the Users share and click OK.

screenshot

Your shared user folder from the PC will then be mounted on the Mac Desktop and will be available in Finder.

screenshot

If you double click the relevant user folder, in this example ifelix you will then be able to access the documents, pictures from the PC on your Mac.

However if I click the Administrator's folder I can find the Documents folder which they are sharing.

screenshot

Stage 6 Sharing Files PC to Mac

On the Windows PC, Start -> Network

screenshot

This will bring up the following window which will list all the computers on the home network.

screenshot

In this window you can see various computers on my network. The Vista PC PELAGIA which is the PC you are on! An 802.11n Airport Extreme base station 802-11N-AIRPORT (which has hard drive sharing capability, like a card reader on a printer so it turns up), various other computers and the Mac I want to access, which is named IFELIXS-IMAC.

You may find initially that the Vista PC can only find itself.

screenshot

If this is the case either wait a minute or two and then click refresh.

Double click the named Mac, in this example IFELIXS-IMAC and you should now see the following screen.

screenshot

The downloads folder is accessible as are the Mac users' public folders. You can drop files into the Drop Box in these public folders and read any files in the public folder itself.

If you want to share the full home directories of both the Mac and the Vista PC user, ensure that both accounts on the Mac and the PC match, they have the same username and password.

AVG Internet Security 2013

Total Pageviews

Contributors